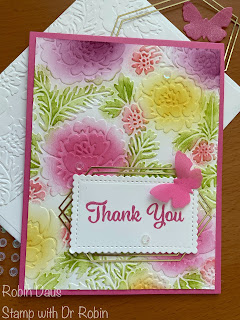
3 Ways to use your Pretty Flowers Embossing Folder
3 Ways to use your Pretty Flowers
Embossing Folder
I just love this new Pretty Flowers Embossing Folder on page 155 in the new 2021-22 Annual Catalog! On my blog to day I will show you 3 different ways to use this folder and later this week I will show you even more ways to use it on a different blog post. You can also watch my Facebook Live below for more ways to use this, and other, embossing folders. For this first card I used Blending Brushes and Sponge Daubers on Thick Basic White cardstock and for the second card I used the same colors on Vellum.
First gather your supplies:
1. Polished Pink and Thick Whisper/Basic White card bases cut 11 by 4 1/4" scored at 5 1/2" and folded
2. Thick Whisper/Basic White and Vellum cut 4 by 5 1/4"
3. Whisper/Basic White cut with the Stitched So Sweetly or the Stitched Rectangle dies for the sentiment piece and a 4 by 5 1/4" or 3 3/4 by 5" piece for the inside.
4. Pretty Flower Embossing Folder (#155428)
5. Stitched So Sweetly Dies (#151690)
6. Stitched Rectangle Dies for he second card (#151820)
7. Artistically Inked bundle (#155456) for the second card
8. Plentiful Plants stamp set (#155693) for the sentiment
9. Ink--Granny Apple Green, Flirty Flamingo, Rich Razzleberry, Daffodil Delight, Polished Pink
10. Ephemera Pack (#155465)
11. Polished Pink Shimmer Vellum (#155616)
12. Meadow Dies (#155852) for the butterfly or you could use Butterfly Brilliance also
13. Blends-- Dark Granny Apple Green, Flirty Flamingo for the second card
14. Basic supplies--bone folder, adhesive (Multipurpose Glue or Stampin' Seal Plus), Dimensionals, Piercing Mat, sponge daubers, Blending Brushes, Glue Dots
Patty Bennett inspired me to make these cards, and my friend Carole asked to see lots of ways to use this embossing folder so here are a few. Run the 4 by 5 1/4" piece of Thick Basic/Whisper White through the embossing machine using the Pretty Flowers Embossing Folder. Then use your Blending Brushes and the Polished Pink, Daffodil Delight and Rich Razzleberry to color the big flowers. Use a Sponge Dauber to color the leaves with Granny Apple Green and the smaller flowers with Flirty Flamingo. Use a light touch on the sponge daubers so that the ink stays on the top of the embossed parts. For more hints, watch my Facebook Live below. Attach that to your folded Polished Pink card base.
Stamp the sentiment from Plentiful Plants in Polished Pink on the Stitched so Sweetly die cut. Attach to the card with glue the gold piece shown below from the Ephemera Pack. Attach the sentiment piece using Dimensionals. Attach the Shimmer Vellum butterfly using a glue dot. Attach 3 or more of the adhesive backed sequins from the Ephemera Pack. If you want to, stamp the smaller flower from the Artistically Inked set on the inside white piece before attaching it. Here's a closer picture below.
The second card uses similar supplies. This time you will be cutting and embossing the vellum. Turn the vellum over and use your Blending Brushes to color the bigger flowers. Use Blends to color the smaller flowers and the leaves, always coloring on the back.
Stamp the smaller flower twice from the Artistically Inked set on white in Rich Razzleberry and Polished Pink inks. Stamp 2 sets of the leaves using Granny Apple Green. Use the dies to cut them out. Glue them together then to the sentiment piece that you stamped with Rich Razzleberry. You can also stamp them inside the card.
Attach the vellum to the card base with a thin layer of glue or Stampin' Seal. Attach the sentiment/flower piece with Dimensionals.
If you noticed I told you I'd share 3 ways to use this embossing folder today and so far I've given you 2. If you go back to the top 2 pictures you will see the third--emboss the flap of your envelope! Such an elegant way to send a card.
For more ideas on ways to use this embossing folder, come back to my blog later this week or watch my Facebook Live below.


.JPG)


What pretty cards and techniques Robin! Thanks
ReplyDeleteThanks for the sharing the instructions for making this beautiful card and all the items you used to create it! GlendaJ
ReplyDeleteBeautiful cards, thank you so much!💜💜💜
ReplyDelete