Posts

Showing posts from October, 2021
Image
Peaceful Deer Scene As I'm running a special Stamp at Home with Dr. Robin class featuring the Peaceful Deer bundle, I thought I'd show you a sneak peek at one of the cards. I wanted to use the stamps to make a peaceful scene, one that you could use for any type of card. I haven't stamped a sentiment inside yet, as I haven't decided yet if this is a winter birthday card or a holiday card. It probably depends on what I need first! First gather your supplies: 1. Basic White Thick cardstock cut 5 1/2" by 8 1/2" scored at 4 1/4" and folded in half. 2. Basic White cardstock cut 3 1/4" by 5 1/2"  3. Basic White cardstock cut using the largest Hippo and Friends die and a scrap for the animals and for the sentiment 4. Garden Green cardstock cut 3 1/2" by 5 1/2" 5. Stamp set--Peaceful Deer (#156891) 6. Dies--Hippo and Friends (#153585) and Stitched So Sweetly (#151690) 7. Embossing folder--Wintery 3D (#155430) 8. Ink--Garden Green, Soft Suede, S
Image
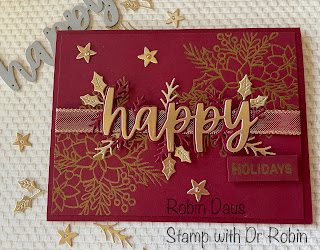
  Gorgeous Words of Cheer Holiday Card S I'd have to say I didn't really notice this set much when the July-December mini catalog came out, but then I saw other demonstrators using it and fell in love with the dies and realized with a little imagination I could use this set for way more than just Christmas cards. But today I wanted to make a beautiful Brushed Gold and Cherry Cobbler holiday card just for you! Big news from Stampin' Up today--on This WEDNESDAY 10/20 only, 15% off all cling stamps from the Annual Catalog. And I'm running a special that day also--spend $75 and use my host code https://www.stampinup.com?hostcode=T4BBGBPA and I will send you some Champagne Rhinestones, as I used on this card, for FREE.       But first, let's make a card! Gather your supplies: 1. Cherry Cobbler cardstock cut 5 1/2" by 8 1/2" , a piece 4 by 5 1/4", a piece 2 by 4", and a scrap of 1/2" 2. Basic White cardstock cut 3 3/4 by 5" for the inside.  3
Image
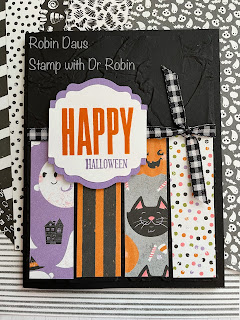
Cute Halloween Card  I thought today I'd make a cute Halloween card using some different stamps that you might not think of for Halloween as well as using the Cute Halloween DSP. This card is really easy and I know I will use this layout again for some holiday cards. First gather your supplies: 1. Basic Black cardstock cut 5 1/2" by 8 1/2" and a second piece 4 by 5 1/4" 2. Basic White cardstock cut 4 by 5 1/4" for the inside.  3. Scrap of Highland Heather and Basic White for the sentiment 4. Cute Halloween DSP (#156479) 5. Stamp set--Biggest Wish (#155052) and A Wish For Everything (#149320) 6. Punch--Label Me Lovely (#151296) 7. Embossing folder--Painted Texture 3D (#154317) 8. Black and White Gingham Ribbon (#156485) 9. Ink--Pumpkin Pie and Highland Heather 10. Basic supplies--bone folder, Paper Snips, adhesive (Multipurpose Glue), Regular Dimensionals Fold your Basic Black cardstock base in half. Take the 4 by 5 1/4" piece of Basic Black and run it throu

Rich Razzleberry Angled Tri-Fold Card

Image
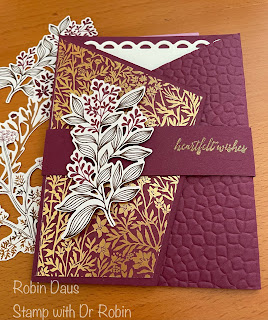
Rich Razzleberry Angled Tri-Fold Card   When you look at this card do you think "Oh that looks too hard, I'm not even going to try that fold"? That's what I thought when I first saw it--how could I do all that angled cutting and make it work, especially with the DSP layer. Well I'm here to say it isn't that hard. You just need to be very precise with the cutting, which is easy to do with the Stampin' Up Paper Trimmer. Blackberry Bliss is one of my most favorite colors, so I can't stop creating with this Blackberry Beauty paper, though this time I used the DSP with a Rich Razzleberry background, so I got to use that paper today.  First gather your supplies: 1. Rich Razzleberry cardstock cut 5 1/2" by 11" and a piece 1 by 10" for the belly band.  2. Basic White cardstock cut 4 by 5 1/4" for the inside.  3. Piece of Blackberry Beauty DSP cut 5 1/4 by 3 3/16" (3 3/16" is just one tiny hash mark smaller than 3 1/4") 4. Sta