
Cute Halloween Card
I thought today I'd make a cute Halloween card using some different stamps that you might not think of for Halloween as well as using the Cute Halloween DSP. This card is really easy and I know I will use this layout again for some holiday cards.
First gather your supplies:
1. Basic Black cardstock cut 5 1/2" by 8 1/2" and a second piece 4 by 5 1/4"
2. Basic White cardstock cut 4 by 5 1/4" for the inside.
3. Scrap of Highland Heather and Basic White for the sentiment
4. Cute Halloween DSP (#156479)
5. Stamp set--Biggest Wish (#155052) and A Wish For Everything (#149320)
6. Punch--Label Me Lovely (#151296)
7. Embossing folder--Painted Texture 3D (#154317)
8. Black and White Gingham Ribbon (#156485)
9. Ink--Pumpkin Pie and Highland Heather
10. Basic supplies--bone folder, Paper Snips, adhesive (Multipurpose Glue), Regular Dimensionals
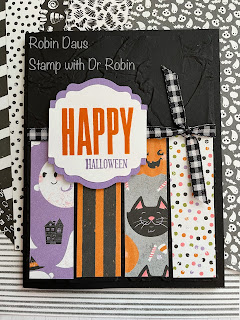
Fold your Basic Black cardstock base in half. Take the 4 by 5 1/4" piece of Basic Black and run it through your embossing machine using the Painted Texture 3D embossing folder.
Cut 4 pieces of the Cute Halloween DSP into 3" by 15/16" (that's just 1 tick less than 1") pieces. Glue those to the bottom of the embossed black piece making sure they are evenly spaced--I find it easier to glue the outside pieces first and then the 2 inside pieces. Tie a piece of the Black and White Gingham Ribbon across the top of the DSP. Attach it to the folded card using Multipurpose Glue.
Using the Label Me Lovely punch, punch a Highland Heather and a Basic White piece. Time to stamp--stamp the Happy using the Biggest Wish set in Pumpkin Pie and the Halloween from the A Wish For Everything set in Highland Heather. Cut the Highland Heather punched piece in half and separate the two pieces and glue to the back of the sentiment piece. Attach to your card using Dimensionals. Here's a close up:

Now for the inside. There's a cute inside sentiment in A Wish For Everything that's perfect for Halloween--stamp it in Pumpkin Pie. Cut something from one of the DSP pieces and glue it to the top right and then attach that to the card. If you want more help, or are just a more visual person, watch my Facebook Live below. If you want to order anything from me click on the Robin to the upper left.

Facebook Live is below:
Comments
Post a Comment