Posts

Showing posts from September, 2021
Image
Hanukkah Card using Textures and Frames So when I look through the Annual and July-December catalogs and didn't see any specific Hanukkah/Chanukah stamp sets, I knew I'd have to get creative to make my Chanukah cards this year. I had seen someone (sorry I don't remember who) use the 3 lines from the FREE Sale-A-Bration set as birthday candles and a light went off in my brain that I could use them to make a menorah (or Chanukiah) that Jews use at Chanukah to commemorate the rededication of the temple. At that time the oil they thought would last only 1 night, lasted 8 days. There's also an extra candle (usually taller/set higher than the others) that is used to light the other 8 candles, so I extended the middle candle a little higher on my card. I'll show you below (and in my Facebook Live video at the end of this post) how I repurposed a scrap to make the base of the menorah.  If you want to make this card, you only have until Thursday 9/30 to get this stamp set fr
Image
Feels Like Home with Cork Paper I don't know about you, but I totally overlooked the Feels Like Home stamp set when I placed my first order from the Sale-a-Bration catalog. It wasn't until I saw others using this large stamp to make quick and easy, yet beautiful, cards that I decided to order it. The great thing about this stamp set is that you can leave it plain, color it a little, or color it a lot--your choice. For this card I just colored it a little using mostly my Blender Pens, which I hadn't used in a while. This would make a great Thank You card for letting me stay at your house, a Welcome to the Neighborhood card, or for someone who just bought a house. Of course, you could also use it for a birthday card, and it's gender neutral so you could give it to anyone. Let's get started making this card. First gather your supplies: 1. Cinnamon Cider cardstock cut 8 1/2 by 5 1/2" scored at 4 1/4" on the long side and folded in half.  2. 2 pieces of Basic W
Image
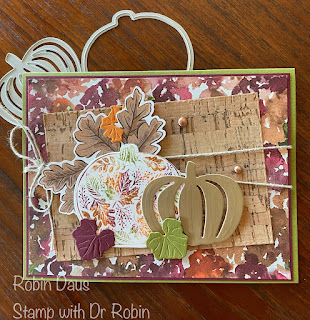
Baby Wipe Technique with Pretty Pumpkins So the first time I saw the Pretty Pumpkins stamp set, this big, beautiful pumpkin stamp caught my eye and all I could think of was, "I have to do the baby wipe technique with this stamp". And I was right, it's the perfect stamp for using this technique! The other thing I wanted to use on this card, as I've had it for a few months and hadn't used it yet, is the Cork Specialty Paper--it actually feels like real cork. This is a great all- occasion fall card. I may use it for Thanksgiving, or even a fall birthday.  Let's get right to making this card.  First gather your supplies: 1. Old Olive cardstock cut 8 1/2 by 5 1/2" scored at 4 1/4" on the long side and folded in half. And a small scrap for a leaf 2. Merry Merlot cardstock cut 4 1/8 by 5 3/8" and a scrap for a leaf 3. A scrap of Pumpkin Pie for a leaf 4. Basic White cardstock cut 3 3/4 by 5" for the inside and a  scrap of Basic White to stamp the
Image
Beautifully Penned Meets Pierced Blooms If you've overlooked the Beautifully Penned Designer Series Paper in the Sale-a-Bration catalog, you are not alone. This gorgeous black and white paper is designed to go with the Hand Penned bundle in the July-December Mini Catalog, but as you can see it makes a great backdrop for almost anything. I've used it here with the Pierced Blooms dies and In Bloom stamp set but this paper is very versatile and can be colored with Blends or Sponge Daubers or Blending Brushes--the possibilities are truly endless. As you can see above, I also used my favorite Sale-a-Bration FREE item, the Be Dazzling paper. I also used the same paper and stamp set and dies to make the similar card below. It's amazing how different it looks using different products. Which do you like better? The blinged-out version above or the colorful version below? Let's make the first card. First gather your supplies: 1. Basic Black cardstock cut 8 1/2 by 5 1/2" scor