
Gorgeous Words of Cheer Holiday Card
SI'd have to say I didn't really notice this set much when the July-December mini catalog came out, but then I saw other demonstrators using it and fell in love with the dies and realized with a little imagination I could use this set for way more than just Christmas cards. But today I wanted to make a beautiful Brushed Gold and Cherry Cobbler holiday card just for you! Big news from Stampin' Up today--on This WEDNESDAY 10/20 only, 15% off all cling stamps from the Annual Catalog. And I'm running a special that day also--spend $75 and use my host code https://www.stampinup.com?hostcode=T4BBGBPA and I will send you some Champagne Rhinestones, as I used on this card, for FREE.
But first, let's make a card!
Fold your Cherry Cobbler card base in half
2. Using Cherry Cobbler ink, stamp “Happy wishes to you and yours” and some holly on the 3 ¾ by 5” piece of Basic White and attach that to the inside.
3. After swiping with your Embossing Buddy, use the big flower/leaf stamp and Versamark ink, stamp on the opposite corners of the 4 by 5 ¼” piece of Cherry Cobbler. Sprinkle with gold embossing powder and heat set with your heat gun.
4. Wrap a piece of Cherry Cobbler and Gold ribbon around your Cherry Cobbler piece and attach on the back (I used Stampin’ Seal Plus, or you could use Tear ‘N Tape). Attach to your card base.
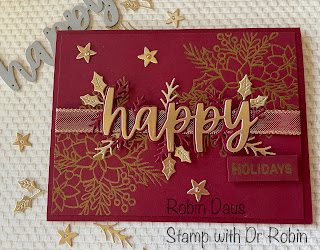
5. Using the big Happy die, cut the back piece from Cherry Cobbler cardstock and the cut the smaller happy from Gold Brushed Metallic cardstock and glue them together. Watch my Facebook Live below for some hints on gluing these pieces together. Use mini Dimensionals on the back to attach to the card.
6. Cut some of the leaves and branches from the Gold Brushed Metallic cardstock and glue them under the ribbon and the Happy. Glue 3 small gold stars around. Put some small Champagne Rhinestones in the center of the stars. Here's a close up of this:

7. Stamp Holidays (or Christmas) on the ½” piece of Cherry Cobbler with Versamark and sprinkle with Gold Embossing Powder. Heat with your heat gun then cut the paper down to size. Attach the Holidays with Dimensionals to the card. Now just marvel at how beautiful it looks!


6.
.JPG)


Comments
Post a Comment