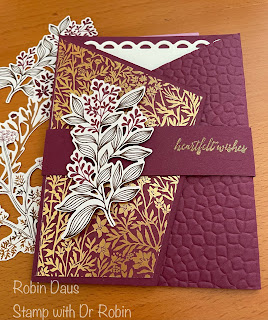
Rich Razzleberry Angled Tri-Fold Card
Rich Razzleberry Angled Tri-Fold Card
When you look at this card do you think "Oh that looks too hard, I'm not even going to try that fold"? That's what I thought when I first saw it--how could I do all that angled cutting and make it work, especially with the DSP layer. Well I'm here to say it isn't that hard. You just need to be very precise with the cutting, which is easy to do with the Stampin' Up Paper Trimmer. Blackberry Bliss is one of my most favorite colors, so I can't stop creating with this Blackberry Beauty paper, though this time I used the DSP with a Rich Razzleberry background, so I got to use that paper today.
First gather your supplies:
1. Rich Razzleberry cardstock cut 5 1/2" by 11" and a piece 1 by 10" for the belly band.
2. Basic White cardstock cut 4 by 5 1/4" for the inside.
3. Piece of Blackberry Beauty DSP cut 5 1/4 by 3 3/16" (3 3/16" is just one tiny hash mark smaller than 3 1/4")
4. Stamp set--Heartfelt Wishes (#156541)
5. Dies--Scalloped Contours (#155560)
6. Embossing folder--Hammered Metal 3D (#150646)
7. Blackberry Beauty Ephemera Pack (#156469)
8. Ink--Versamark
9. Supplies for embossing--Gold Embossing powder, heat gun, Embossing Buddy
10. Basic supplies--bone folder, Paper Snips, adhesive (Multipurpose Glue), Regular Dimensionals, Tear 'N Tape
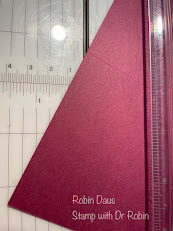
Take your Rich Razzleberry cardstock and score it at 3 3/8" from both ends. Then take the top left corner and place it on the 1 1/2" line and the score line in the cutting channel as on the picture below left--be very precise and then cut. Do the same on toe top right side--you can either flip it over and do it the same, or it's easier to place it on the right edge of the white marked side (see the picture on the right below) as that is the 1 1/2" line, and cut off that little piece.
Now you will put the point you just made in the cutting groove and the bottom point of the card at 1" and cut again. Do both sides like this--it's easiest to cut from the bottom up.
Now take your Blackberry Beauty DSP, decide which side you want to put it on, and cut the same 1 1/2" triangle off the top and 1" off the bottom to match what you just did above. It should look like this if using it for the left front panel:
Fold your card along the score lines, towards the center. Now take what will be the right front panel and put it in the Hammered Metal 3D Embossing Folder and fold the rest behind the folder and run it through the machine. If you want the bumps to be like mine above, then turn the folder upside down. Attach your DSP to the front left panel.
Take your piece of Basic White and cut it out with the largest Scalloped Contours die. Attach it to the inside of your card. Now fold your belly band around the card, having the front edge be where it will be under the Blackberry Beauty Ephemera Pack flower of your choice. Don't stick it together yet as you will want to emboss your sentiment first. On the right front of the belly band, emboss your sentiment. Start by wiping the area with your Embossing Buddy or a piece of dryer fabric sheet like Bounce. This sentiment came from Heartfelt Wishes--I masked off the "&" with some washi tape, stamped it in the Versamark, removed the tape, and stamped on to the right front part of the belly band. Put some gold embossing powder over the Versamark, tap off the excess and heat with your heat gun--I never get tired of watching that magic!
Now wrap your belly band loosely around your card, and stick it together--I used Tear 'N Tape but you could also use glue but just let it dry well before sliding your belly band. Use Dimensionals to attach one of the pretty flowers from the Ephemera Pack.
Here's a close up of this beautiful card:
You could also use 2 pieces of DSP for the front, the same one or even 2 different ones. You could even just stamp on the cardstock, inside and out. The possibilities are endless.
I have card classes at my home in San Diego, and will also send you everything you need to make 4 beautiful cards each month. Here's some info about the next class:
Class dates and times: Friday October 15th 9:30 am and Sunday October 17th at 1 pm, my backyard (with masks)
Options: 1. Words of Cheer Bundle--4 cards with envelopes, plus Champagne Rhinestones and the Words of Cheer stamp set and dies $65.2. Words of Cheer stamp set--4 cards with envelopes, plus Champagne Rhinestones and the Words of Cheer stamp set $353. 4 cards with envelopes, plus Champagne Rhinestones--$20All of the above are also available as a Stamp with Dr. Robin at home and I'll email you the directions. Add $8 to the above. Last day to sign up is October 7th.
Here's my Facebook Live for more info and tips:


.JPG)


You have really done great job by sharing the beautiful post. Thanks lot for the informative post. Learn to read more about Custom Tri fold folders
ReplyDelete