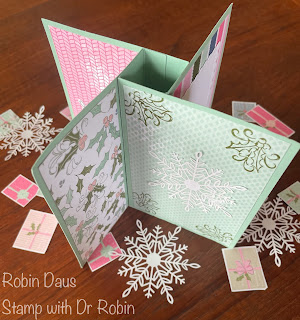
Whimsical Trees Pinwheel Tower Card
Whimsical Trees Pinwheel Tower Card
Don't you just love this card? This is a fun fold called a pinwheel tower card made with all parts of the Whimsy & Wonder Suite. I know it looks hard, but it's really easy. I love that this suite uses the non-traditional Christmas colors of Polished Pink, Blushing Bride, Mossy Meadow, Mint Macaron and Misty Moonlight. I've seen others make this card with 5 or 6 pages/sides instead of 4 and other sizes OF this card--this one folds flat and fits into a 5 by 7" envelope (I bought mine through Amazon). To help with designing this card using other cardstock watch my video below where I discuss that, or watch Patty Bennett's YouTube video. Here's a look at the other sides of this card:
First gather your supplies:
1. Mint Macaron cardstock, one piece 5 by 7" scored on the long side at 1/2", 1 1/2", 2 1/2", and 3 1/2". Then 3 pieces cut 3 1/2" by 5"
2. Whimsy and Wonder Specialty DSP (# 156329), four pieces cut 3 1/4 by 4 3/4" and four pieces cut 2 1/4 by 4 3/4".
3. Basic White cardstock die cut with Stitched So Sweetly second largest rectangle die and the second to smallest other die. Also cut one of the trees in Basic White.
4. Scrap of Mossy Meadow--Die cut the 2 baby trees
5. Wonderful Snowflakes (#156340)
6. Blushing Bride 3/8" Frayed Grosgrain Ribbon (#156341)
7. Whimsical Trees Bundle (#156810)
8. Stitched so Sweetly Dies (#151690)
9. Ink--Mossy Meadow
10. Wink of Stella
11. Basic supplies--bone folder, adhesive (Multipurpose Glue), Tear 'N Tape, Paper Snips
First be sure you've scored the large piece of Mint Macaron as above, then fold and burnish all the folds. On the 1/2" end piece, put a piece of Tear 'N Tape as below. Now fold that piece under and fold on the second in fold and stick it down flat--see pictures below or my Facebook Live video below for a better look as how to do this. Now take the 3 1/2 by 5" pieces of Mint Macaron and adhere (glue or Tear 'N Tape) one to each of the sides of the center square--the last picture below shows how to place them. Just keep adding around the square.
Now you are ready to start decorating each side of the card. This is easiest to do with the card laying flat. Use a 2 1/4 by 4 3/4" piece of DSP on one side and a coordinating 3 1/4 by 4 3/4" piece of DSP on the facing side. For this first page on the right, I used the holly/berry stamp set in Mossy Meadow ink in each corner and one of the snowflakes. These snowflakes are cool as one side is iridescent and one is regular cardstock that can be colored with ink or blends.
This next page features a Basic White Stitched so Sweetly piece that people can write their message on or just sign their name. It also has two of the baby trees cut from the Christmas Trees Dies in Mossy Meadow. I used just a bit of glue (see the video for hints to glue them) to stick them on.
For these pages, I let the gorgeous paper do most of the work. I cut the tree in Basic White (save those other pieces that come out to use as snow inset on another colored tree). Put some Wink of Stella on this tree either now and put it aside and adhere after it is dry, or glue the tree on now and put the Wink of Stella on after the card is finished and put it aside to dry then. Cut 3 presents out of the DSP and glue them to the shiny striped DSP and adhere both DSP to the card.
Last page is the sentiment page. Stamp the sentiment in Mossy Meadow on the small white piece you cut with the Stitched So Sweetly dies and glue it to the Mint Macaron piece cut from the same die set. Cut a small piece of the Blushing Bride Frayed Grosgrain ribbon and stick it on with Tear 'N Tape then stick down the Mint Macaron piece with the same.
Cut 2 ornaments from the DSP and glue them on the Polished Pink page and you are done!
Again, more tips and tricks on my video below. Please let me know if you need any of these supplies or click on the Robin in the above left on the blog to order. Don't forget my host code, S6FKSDVN.
If you haven't joined Stampin' Up yet, I'd love to have you on my team. Now is a great time to join as in addition to the usual deal ($125 of product and free shipping for $99) they are adding a BUNDLE from the new July-Dec catalog. You get to choose from 12 different ones. And that's all you have to do to then save 20% on what you buy from now until the end of December. And if you don't want to do anything else you can be done and drop. But if you do spend $300 during that time, you get to stay on for another quarter.
HAPPY STAMPIN'


.JPG)


Very pretty!!
ReplyDelete