
Fun Fold Frosted Gingerbread Card
I've learned a new fun fold this week and thought I'd share it with you today. I learned this fold from Lyssa at Song of My Heart Studios--she used the Peaceful Cabin set to make her card and I've made it using a couple other paper packs and it comes out great every time. This is what I love about Stampin' Up--everything coordinates so well and I can always make a great card with our products. Here's a picture of our card opened up and it folds up to fit in a regular envelope.

Let's get going on making our card. First gather your supplies:
1. Real Red cardstock cut 5 1/2" by 11" scored at 4", 5 3/4", 7 1/2" and 9 1/4"
2. From what's leftover from the Real Red cardstock above, cut a 6 by 3" strip and score at 3" and use a scrap piece for the die cut for the last page
3. Basic White-- 2 pieces 2 3/4" squares and 1 piece 2 3/4 by 3 1/2"
4. Gingerbread & Peppermint DSP-- 1 piece 3 3/4 by 5 1/4" for the last page and 3 pieces 1 1/2" by 5 1/4". Fussy cut (hand cut out) a tree from the DSP also.
5. Stamp set--Frosted Gingerbread (#156807 for the bundle)
6. Dies-- Gingerbread dies
7. Red Rhinestones (#144220)
8. Ink--Real Red
9. Basic supplies--bone folder, Paper Snips, adhesive (Multipurpose Glue and Mini Glue Dots), Regular Dimensionals, Die Cutting and Embossing Machine
Start by folding the card base--first fold on the 4" score and then accordion fold the others like above. Burnish each fold really well with your bone folder. Attach the DSP--the big piece goes on the back and the others go on the smaller areas. I attached the DSP with Multipurpose Glue.
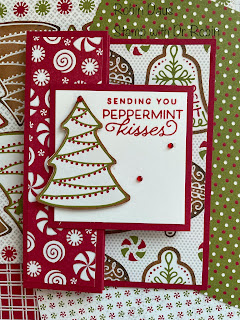
Now let's stamp. Using Real Red ink, stamp one of the 2 3/4" Basic White squares with the sentiment in the upper right for the front as below. Attach your fussy cut tree using Dimensionals and add 3 Real Red Rhinestones (see the one on the top of the tree?). Attach that to one side of the 6 by 3" piece of Real Red cardstock.

To attach the 6 by 3" piece of Real Red, put 3 glue dots on each 3" edge, lay the back ("Wishing you a Merry Christmas") side against the back white piece making sure the white piece is covered, then fold the rest of the card closed and attach the other side to the front. Please watch my Facebook Live below to better see how this is done.

Enjoy my Facebook live for more pointers.
Enjoy my Facebook live for more pointers.
.JPG)


Comments
Post a Comment