
Sweet Conversations Valentine's Day Cards


Today I'm going to show you how to make two more Valentine's Day cards from the Sweet Conservations bundle. I just love the happy colors in this DSP and the adorable tiny envelope that you can make from the dies is to die for! I can see that envelope making an appearance on many more cards in the future. This set is so versatile--if you just change the sentiments on these cards you can easily use them for birthday or anniversary cards. As always, my Facebook Live video is attached--come watch me live every Monday at 1 pm (PST).
Let's make two cards. First gather your supplies for both:
1. Basic White thick cardstock cut 8 1/2 by 5 1/5" scored on the long side at 4 1/4" and folded in half (first card above)
2.Pool Party cardstock 11 by 4 1/4" scored on the long side at 2 3/4 and 5 1/2" (card 2)
3. Basic White cardstock 4 1/8 by 2 5/8" for the inside (card 2), a piece cut from the 3rd largest Scalloped Contours dies (card 2) a 1/2" strip for the sentiment (card 1)
4. Highland Heather cardstock cut 4 1/8 by 5 3/8" (card 1)
5. Real Red cardstock cut 2 1/2 by 5 3/8" (card 1), scrap of red for the hearts and a 1/2" strip for the sentiment.
6. Sweet Talk DSP (#157616) 2 pieces each cut 4 1/8 by 2 5/8" ( card 2) and a piece 5 3/8 by 2" (card 1)
7. 2021-22 In Color Shimmer Vellum (#155616)--cut an envelope out of the Fresh Freesia
8. Stamp set- Sweet Conversations (bundle #157624, stamp set #157618)
9. Embossing Folder--Gingham (#157627)
10. Dies--Scalloped Contours (#155560) and Sweet Hearts (#157623 or in the bundle #157624)
11. Ink-- Real Red, Highland Heather
12. Iridescent Rhinestones Basic Jewels (#158130)
13. Basic supplies--bone folder, Paper Snips, Piercing Mat, adhesive (Multipurpose Glue), Regular Dimensionals (regular and mini), Die Cutting and Embossing Machine (mini or regular)
14. Supplies for embossing--White embossing powder, embossing buddy, heat gun
For the top card (card 1), start by folding your Basic White card base in half. Run the Highland Heather cardstock through your machine using the Gingham Embossing folder--did you notice on the card how cute this folder is? Attach that to your card base. Now using the long scalloped edging die in Scalloped Contours cut the long edges of Real Red cardstock. Attach a 2 by 5 3/8" piece of Sweet Talk DSP to the red then attach to the card. Using the Sweet Heart die that cuts 6 hearts in a long row, cut out hearts from a scrap of Real Red. You will use the inside of these hearts on this card, and the outside for the next card.
Using Real Red ink, stamp Happy Valentine's Day on your 1/2" strip and flag the right side (or both if you'd like). For the inside, stamp the "Luv U" stamp and the solid heart stamped off inside. Attach 2 little hearts as below:

Back to the front of your card now. Using the 2021-22 In Color Shimmer Vellum, cut an envelope out of the Fresh Freesia and fold it up along the score lines. Attach a little red heart to a Mini Dimensional and use that to close up your envelope. Attach the Fresh Freesia envelope to your card base using a thin layer of glue or glue dots. Attach 3 more tiny hearts to the front of the card. Attach your sentiment using Dimensionals and then scatter some Iridescent Rhinestones around.
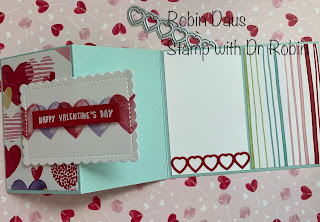
Now let's make the second card. Fold your Pool Party card base in half, then on the 2 3/4" score line, fold that piece back to become the front of your card. You can see below better how that looks or watch the video--I've been making this Z-fold card a lot lately. Attach the 2 pieces of 2 5/8--one to the front and one to the right inside. Attach the 4 1/8 by 2 3/8" piece of Basic White to the inside. Attach the outlined hearts to the bottom of the white after cutting off one of the hearts.
Using the largest solid heart and first Real Red, stamp a heart in the center and then 2 off the edges of the Basic White Scalloped Contours 3rd largest rectangle. Clean your stamp and stamp between the red hearts in Highland Heather. Embosss the sentiment in white embossing powder on your 1/2" strip of Real Red. Cut it down to size and attach to the rectangle using Dimensionals. Use Dimensionals to attach just the left side of the rectangle to the front of the card--don't make the mistake of sticking them on the right half or you won't be able to open the card! Stamp some red hearts on your envelopes and you are all ready for Valentine's Day!
Watch my Facebook Live for more trips and tips. In the video I make the second card first.
.JPG)


Comments
Post a Comment