
Flowering Rain Boots Bridge Card
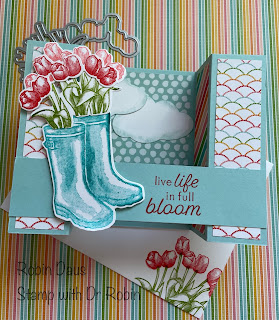
This is such a happy card and I'm sure the recipient will love getting it, especially if they are living somewhere that it is snowing or raining or gloomy. This will brighten their day, whether used as a note to check in and say hi, or used as a birthday card. And did you notice the layout of the card? This is called a bridge card and it's actually really easy to make. Please watch my Facebook Live below to best see how to make this card.
Gather your supplies to make this card.
1. Pool Party cardstock 4 1/4 by 8" scored on the long side at 1 1/4 and 2 1/2" from each end (or 1 1/4, 2 1/2, 5 1/2 and 6 3/4") and another piece 1 1/4 by 5 1/2"
2. Basic White cardstock 2 3/4 by 4" for the back, more for stamping and cutting out the boots, flowers and clouds
3. Pattern Party Designer Series Paper (#155426) 3 different patterns. For 2 patterns cut 2 pieces of each 1 by 4". 3rd pattern 2 3/4 by 4"
4. Stamp Set--Flowering Rainboots (#157689 stamp set or #157691 bundle)
5. Dies--Rain Boots (#157690 or or #157691 bundle)
6. Ink-- Flirty Flamingo, Poppy Parade, Granny Apple Green, Bermuda Bay, Pool Party
7. Cloud Punch (#157749)
9. Basic supplies--bone folder, Paper Snips, adhesive (Multipurpose Glue), Regular Dimensionals, Die Cutting and Embossing Machine, Blending Brushes
Now to stamp--all on Basic White cardstock. Stamp the tulip tops in Poppy Parade and Flirty Flamingo. Stamp the stems in Granny Apple Green and the boots in Bermuda Bay. Cut them all out with the dies. Attach them together with glue--start with gluing the tulips together then attach them to the stems, then to the boots as below. Stamp some stems and tulips on the envelope too.


Please let me know if you need any of these products or click here to shop at my store:
https://www.stampinup.com?demoid=2161733
Or email me with questions at stampwithdrrobin@gmail.com
Here's my Facebook live for some more tips and tricks. I go live every Monday at 1 pm PST so see you next Monday.
.JPG)


Comments
Post a Comment