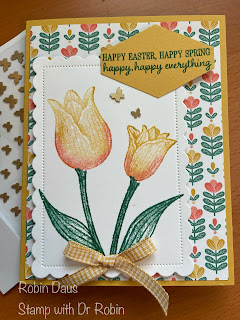
Timeless Tulips Easter Card
First, gather your supplies to make this card.
1. Bumblebee cardstock 5 1/2" by 8 1/2" scored on the long side at 4 1/4", another scrap for the sentiment, punched with the Tailored Tag punch. RETIRING 5/2/22 WHILE SUPPLIES LAST
2. Basic White cardstock 3 3/4 by 5" for the inside, another piece cut from the second largest Scalloped Contours die
3. Sweet Symmetry Designer Series Paper (#155605) cut 4 by 5 1/4". RETIRING 5/2/22 WHILE SUPPLIES LAST
4. Stamp Set-- Timeless Tulips (#151534). RETIRING 5/2/22 WHILE SUPPLIES LAST
5. Punch--Tailored Tag (#145667) RETIRING 5/2/22 WHILE SUPPLIES LAST
6. Dies--Scalloped Contours (#155560 or #158356 in the bundle)
7. Bumblebee Gingham Ribbon (#153658) RETIRING 5/2/22 WHILE SUPPLIES LAST
8 Brushed Brass Butterflies (#158136)
9. Ink-- Calypso Coral, Just Jade, Bumblebee. The last 2 RETIRING 5/2/22 WHILE SUPPLIES LAST
10. Basic supplies--bone folder, Paper Snips, adhesive (I like Multipurpose Glue), Piercing Mat, Regular Dimensionals, Die Cutting and Embossing Machine (the Mini is on sale for 20% off through the end of March), Mini Glue Dots, Sponge Dauber
Start by stamping on your Scalloped Contours Basic White die piece--stamp the leaves and stems in Just Jade (watch the Facebook Live below for some hints on this) and then a large and small tulip. To get the beautiful shading of the tulips, stamp first in Bumblebee then using a sponge dauber, apply a little Calypso Coral to the base of the flower. Stamp a flower and stem on the Basic White piece for the inside and for the envelope also. Here's a close up of the front of the card:
Now using Just Jade ink, stamp the sentiment on Bumblebee cardstock that you've punched with the Tailored Tag punch. Now let's put this card together. Fold your card base in half and attach the piece of Sweet Symmetry paper to the front and the Basic White 3 3/4 by 5" piece inside. Attach the stamped flowers to the bottom left (leave a little of the DSP showing) using Dimensionals. Use a Dimensional at the top and the right side of the sentiment, and a little glue on the bottom left to attach the sentiment. As you can see below, the sentiment piece overlaps the white (which is already popped up on Dimensionals, so put just a smidge of glue where they overlap. Then add a gingham bow to the bottom (I used Glue Dots to attach) and a small and large Brass Butterfly wherever looks good to you.


.JPG)


Comments
Post a Comment