Sunny Splash
Let's get to making these cards. First, gather your supplies.
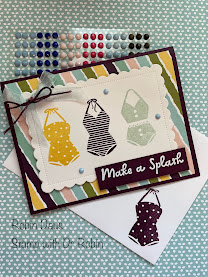
Card 1 (the 3 bathing suit one)
1. Blackberry Bliss cardstock 5 1/2" by 8 1/2" scored on the long side at 4 1/4", and a piece 3/4 by 3" for the sentiment.
2. Basic White cardstock 3 3/4 by 5" for the inside
3. Shimmer White cardstock die cut with the Second largest Scalloped Contours die
4. Design a Daydream DSP (#159161) cut 4 by 5 1/4"
5. Stamp Set--Sunny Splash (#158784) though on my video I used Flowing Flowers (#157880) for a different sentiment
6. Dies--Scalloped Contours (#155560)
7. Ribbon--Pool Party Sheer Ribbon (#152462) and Baker's Twine Essentials Pack (#155475)
8 Solid Faceted Gems (#159189)
9. Ink--Blackberry Bliss, Pool Party and Daffodil Delight
10 Blackberry Bliss Blend
11. Embossing supplies--White Embossing Powder, Embossing Buddy, Versamark ink and a Heat tool
12. Basic supplies--bone folder, Paper Snips, adhesive (I like Multipurpose Glue), Regular and Mini Dimensionals, Die Cutting and Embossing Machine, Mini Glue Dots.
In addition to above, card 2 uses Petal Pink cardstock for the same size card base and Pool Party for another layer.
For the first card use your Shimmer White layer and stamp the center bathing suit first, in Blackberry Bliss, then the one on the right in Pool Party and the one on the left in Daffodil Delight, spacing them evenly. Stamp another bathing suit on the Basic White piece for the inside. Also stamp a bathing suit on your envelope.
Now emboss the sentiment. Wipe your small piece of Blackberry Bliss with your Embossing Buddy (or an old, used dryer sheet) to keep stray powder off. Stamp your sentiment with Versamark, pour some white embossing powder over the top then tap the back to remove excess. Melt with heating tool. If you don't know how to heat emboss, my video will help.
Time to make your card. Fold the card base in half then adhere the Basic White piece inside and the DSP to the outside. Attach your bathing suit piece using Dimensionals. Now attach the sentiment piece by putting mini Dimensionals to the bottom and glue on the top and attach like below.
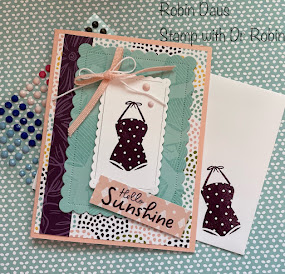
Now for the second card. Fold your Petal Pink card base in half. Attach a piece of 4 by 5 1/4" DSP to the front and then a coordinating piece that is 3/4" by 5 1/4" to the left side of the above DSP.
Take a piece of Pool Party cardstock about 4 by 5 1/4" and stamp one of the bathing suits randomly around the page with Versamark ink. Using the second largest Scalloped Contours die, cut out the Pool Party piece. Stamp a piece of Basic White cardstock die cut from the 4th largest Scalloped Contours die with the same or different bathing suit in Blackberry Bliss ink. Use the same ink and stamp a sentiment on a 3/4 by 2 1/2" piece cut from the same DSP I used for the big piece, but using the back side. Stamp a bathing suit on the inside piece also and attach it inside the card.
Attach the Pool Party stamped piece with glue, then the Basic White piece using Dimensionals. Use the Petal Pink ribbon from the Cotton Ribbon Combo Pack (#158140) found in the Jan-June mini catalog and the white Baker's Twine and tie them together in a bow and attach to the top of the Basic White stamped swim suit piece using a glue dot. Attach the sentiment piece like you did for card 1. Use 2 of the Petal Pink Solid Faceted dots and you are done with the second card. Here's a close up:
My Facebook Live below will help if you get lost making these 2 cards, as well gives you pointers and an update on Stampin' Up news. I'm live on Stamp with Dr Robin every Monday at 1 pm PST so please come join me. If you click on the Robin to the left, you can purchase everything I used here. See you next week and happy stampin'.
Robin


.JPG)


Comments
Post a Comment