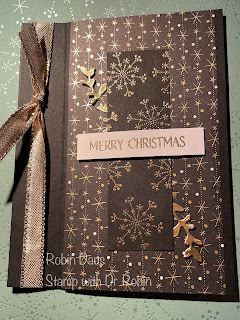
Black and Gold Bookbinding Card
I had a Holiday Card Buffet this past weekend and this was one of the cards we made. I love making cards using non-traditional colors for Christmas. Not that red and green aren't a great combo, but the black and gold in this card steps it up to something elegant and special. You could also use this card as a New Years card, or an elegant birthday, anniversary or congratulations card. At the end of this post is another card I made with this fold in different Designer Series Paper.
We made a lot of gorgeous cards this weekend. If you want the pdf for ALL 19 cards that were available at my holiday card buffet, please email me at stampwithdrrobin@gmail.com and I will sell it to you for only $25.
Now on to making this card. Gather your supplies:
1. Basic Black cardstock--Card base 5 1/2 by 8 1/2" scored on the long side at 4 1/4" and 5 1/4" folded in half along the score line. Another piece 4 by 1 1/4"
2. Basic White cardstock--a piece 3 by 5 1/4" for the inside and a 1/2" scrap for the sentiment
3. Gold Foil--2 pieces die cut with the Natural Print dies
4. Lights Aglow DSP cut 3 by 5 ½”
5. Stamp Set--Peaceful Dear (#156891), Brightest Glow (#159542) and Christmas Lights (#159538)
6. Ink--Momento Black and Versamark
7. Gold Shimmer Ribbon (#156470)
8. Embossing supplies--Versamark, embossing buddy, gold embossing powder and heat gun
9. Basic supplies--bone folder, Paper Snips, adhesive (I like Multipurpose Glue), Tear 'N Tape, Dimensionals, Piercing Mat, Embossing/Cutting machine
1. Fold the Basic Black card base in half along the central score line (4 ¼”). Fold the front back along
the 5 ¼” score line.
2. Tie the Gold 3/8” Shimmer Ribbon in a
knot around the left front. Using a strong adhesive (like Seal Plus or Tear ‘N
Tape) tape shut the card to the left of the 1” front fold. I used 2 pieces of
Tear ‘N Tape and made sure my ribbon was in the middle. It should look like this before you remove the white backing of the Tear ‘N Tape. Make sure to rub your bone folder again over both folds.
Attach your Lights Aglow black and gold DSP to the right front.
4. Stamp an inside sentiment to the inside white piece (3 by 5 ¼”) using Memento Black ink or emboss it like I did on my video--I used one from the Brightest Glow stamp set. Attach that to the inside of the card.
5. Stamp the Merry Christmas sentiment (from Peaceful Deer) on the ½” scrap of Basic White in Versamark after using your embossing buddy. Cover in Gold Embossing powder, tap off the excess and heat with your heat tool. Using the same gold embossing powder and technique, randomly stamp the medium sized snowflakes from the Christmas Lights stamp set along the Basic Black (1 ¼ by 4”) cardstock. Below is another version where I only stamped 3 snowflakes down the center

Figure out where you want the black strip of snowflakes, and before gluing it down, attach the 2 Gold Foil sprigs from the Natural Prints dies underneath.
7. Attach the front sentiment with Dimensionals. Here's a couple other versions of this book-binding card.
Here is my Facebook live from 11/21/22 where I make this card and show you some tips to help with the cardmaking. Join me every Monday at 1 pm PST for some cardmaking fun over on Stamp with Dr Robin on Facebook. As always click on the Robin above left to order from me or go to https://www.stampinup.com?demoid=2161733


.JPG)


Lovely, distinctive card
ReplyDelete