
Country Floral Lane Barn Door Card
Before I get to making this card, I have a couple announcements. First is I am doing a Paper Share--you will receive 1/4 of each of the following Designer Series Papers from the new Jan-April Mini Catalog: By the Bay, Country Floral Lane, Country Gingham, Delicate Desert, Dry Brush Metallic, Enjoy the Journey, Fancy Flora, Like an Animal, Rain or Shine, Regency Park, Textured Shimmer as well as a bonus sample of Flowers & More Host DSP for free. This is all for $40 for porch pick-up or $49 to have it mailed to you. Email me at stampwithdrrobin@gmail.com if you are interested.
I also want to announce that I am selling Mystery Boxes of retired Stampin' Up product. These are a medium sized USPS Priority Mail box and they will be stuffed with product. Each box will include a minimum of 10 Stampin' Up stamps and at least 2 of them will be a bundle with either a die set or a punch. They will all have at least one retired embossing folder as well as embellishments and ribbon. You won't know what you are getting, so if you like surprises and getting over $250 worth of products for only $50 (plus $20 for shipping), please email me at stampwithdrrobin@gmail.com. Someone who just received one of these boxes emailed me: "Thank you so much, got the box a day early. Loved it".
Now on to making this card. Everything I used on this barn door card came from the Country Floral Lane Suite on pages 8-10 in the upcoming Jan-April Mini Catalog. Please let me know if you aren't working with a demonstrator already, and I can send you a catalog. This suite is perfect for Valentine's Day, but also for birthday, just telling people how much you care, or lots of other reasons. And it comes with 2 different DSP paper--check out my Facebook Live below to see all the paper.
Let's make this card! Gather your supplies:
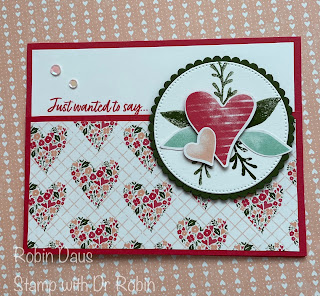
1. Sweet Sorbet cardstock--Card base 4 1/4 by 11" scored at 5 1/2" and folded along the score line.
2. Country Floral Land DSP-- 2 1/2 by 5 1/4" and punch out the hearts/leaves from another piece
3. Mossy Meadow cardstock--die cut the second largest scalloped Layering Circle
4. Basic White cardstock--4 by 5 1/4" for the inside and die cut the second largest Stylish Shapes circle
5. Stamp Set--Country Bouquet (#160377 or #160382 for the bundle)
6. Dies--Stylish Shapes (#159183) and Layering Circles (#151770)
7. Punch--Country Bouquet (#160382 or #160382 for the bundle)
8. Ink--Mossy Meadow, Sweet Sorbet (you may need Mint Macaron also)
9. Pastel Adhesive-Backed Sequins (#160387)
10. Iridescent Pastel Gems (#160429)
11. Basic supplies--bone folder, Paper Snips, adhesive (I like Multipurpose Glue), Regular and Mini Dimensionals, Die Cutting and Embossing Machine, Paper Trimmer
Let's start by folding your card base in half along the score line, then open it up and cut the top 1 1/2" off the top front. Using your Paper Trimmer cut down 1 1/2" along the score line, then cut in 1 1/2" and all the way to the score line--watch the video below if you don't understand these directions.
Now take the inside Basic White piece and lay it in place (DO NOT glue it in yet) and close the front flap. In Sweet Sorbet, stamp the "Just wanted to say.." sentiment just above the front flap.
Now take the inside Basic White piece and lay it in place (DO NOT glue it in yet) and close the front flap. In Sweet Sorbet, stamp the "Just wanted to say.." sentiment just above the front flap.

Open the front and stamp "Happy Valentine's Day" so that it is below the flap (so you can't see it when closed) like this. Now attach the Basic White piece to the inside of the card.


Now let's make the circle part. Using the Country Bouquet punch, punch out the hearts and flowers from the Country Floral Lane DSP. Some of the sets on the paper have Mint Macaron leaves, as below, and some have Mossy Meadow leaves (like in my video below). Use the opposite color ink to stamp a second set of leaves about 1/3 the way down the circle. When using the Mossy Meadow ink, I stamped it off before stamping on the circle. Stamp 3 of the twigs, some full strength and some stamped off. Attach the punched leaves using glue and the big heart using Dimensionals. Put a Mini Dimensional under the left side of the small heart and a dot of glue on the right side of the small heart and attach like below.


.JPG)


Comments
Post a Comment