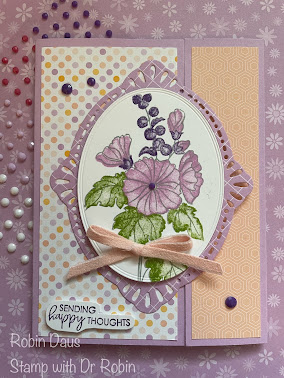
Beautifully Happy Gatefold Card
I still have 2 Mystery Boxes of retired Stampin' Up product left. These are a medium sized USPS Priority Mail box and they will be stuffed with product. Each box will include a minimum of 10 Stampin' Up stamps and at least 2 of them will be a bundle with either a die set or a punch. They will all have at least one retired embossing folder as well as embellishments and ribbon. You won't know what you are getting, so if you like surprises and getting over $250 worth of products for only $50 (plus $20 for shipping), please email me at stampwithdrrobin@gmail.com. Someone who just received one of these boxes emailed me: "Thank you so much, got the box a day early. Loved it".
This card uses mostly FREE products from the Jan-Feb Sale-a-Bration catalog. The stamp set and the Designer Series Paper are each free with a $100 order, but other items in the catalog are free with a $50 order. Please let me know if you aren't working with a demonstrator already, and I can send you a catalog. The Beautifully Happy stamp set is a 2 step Distinctive stamp set, so the flowers and leaves have so much depth and make it look like you spent hours coloring it. And the Dandy Designs DSP has 48 sheets of delicious paper that will make amazing cards all spring long.
Let's make this card! Gather your supplies:
1. Fresh Freesia cardstock--Card base 5 1/2 by 8 1/2" scored at 1 1/2 and 5 3/4" on the long side and folded in along the score lines.
2. Dandy Designs DSP-- 3 different patterns. 1 cut 2 1/2 by 5 1/4", another cut 1 1/4 by 5 1/4" and the third die cut with the largest Framed Florets oval die
3. Basic White cardstock--3 3/4 by 5" for the inside and another about 4 by 5 1/4" for stamping the flowers, and a scrap for the sentiment
4. Stamp Set--Beautifully Happy (#160804)
5. Dies--Framed Florets (#160623)
6. Ink--Smokey Slate, Fresh Freesia, Granny Apple Green and Gorgeous Grape
7. Opaque Adhesive-Backed Gems (#160412)
8. Petal Pink Soft Polyester Ribbon (#159192)
9. Dark Petal Pink Blend
10. Basic supplies--bone folder, Paper Snips, adhesive (I like Multipurpose Glue), Regular and Mini Dimensionals, Die Cutting and Embossing Machine, Paper Trimmer, Mini-Glue Dots
Let's start by making the card base. Fold along the fold lines, folding both inwards to meet in the middle. I had the smaller piece on the right side, but you could do it either way. Attach the 1 1/4" piece of DSP to the smaller side and the 2 1/2" piece to the larger side.
Time to stamp. On a piece of Basic White cardstock, stamp the large flowers/leaves outline in Smokey Slate. Then use Fresh Freesia to stamp the flowers. Next ink up the leaves with Granny Apple Green and stamp them off (on a scratch piece of paper) and then without re-inking stamp on your image. Use Gorgeous Grape to stamp the buds at the top. For more hints on using this stamp set, please watch my Facebook Live at the end of this post. Now cut out your image using the largest Framed Florets die. Using the same die, cut out one of the Fresh Freesia pieces of Dandy Designs DSP--save the inside for something else.
Now take the 3 3/4 by 5" piece of Basic White for the inside and in Gorgeous Grape ink, stamp the inside sentiment. Stamp the small flower outline in Smokey Slate, and use Fresh Fresia to stamp the flower petals, and stamped off Granny Apple Green to stamp the bud. The tiny dots in Smokey Slate make a cute addition to this corner. I used a Dark Petal Pink Blend to color the center of the little flower. Attach this to the inside of your card.
Cut a piece of Petal Pink ribbon down the center lengthwise to make a smaller sized ribbon, make a bow with it and attach with a Mini-Glue Dot. Now scatter some Opaque Adhesive-Backed Gems around the front, being sure to put a little one in the center of the biggest flower. Here's another look at the finished product:


.JPG)


Comments
Post a Comment