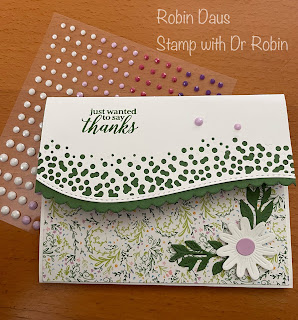
Around the Bend Fancy Fold
I saw this fancy fold on Debbie Mageed's website (secretstamper.com) and had to try it as I had bought the Around the Bend bundle a few weeks ago and had yet to use it. If you are like me, the dies had intimidated me a bit, so it was nice to see a card with them in action. The Around the Bend dies are even used for the flower and the leaves. Please watch my Facebook Live below for tips on using the dies--they are really great to use once you play with them for a while. I've also been going back to the Annual Catalog lately for inspiration--the Designer Series Paper is from the Tea Boutique set. The colors are so beautiful, as are the designs, even the ones without tea cups in them, like this one.
There's something new that Stampin' Up is trying with this stamp set--you can choose to buy it in photopolymer (see through) or as cling (red rubber) stamps. There are several stamp sets in the catalog like this so choose carefully when you order. I chose photopolymer for this one, mostly because of the long lines that you would line up with the cut curved dies--I though those would be easier with photopolymer.
Remember that Stampin' Up is having a color refresh with this Annual Catalog in May, as well as the 2021-23 In Colors will be going away then also. So if there is a color you just love, please order it now so you aren't disappointed if it sells out. Think ink, ink refills and cardstock--they all tend to sell out at the end of a catalog.
Now let's finish putting this card together. Attach the Tea Boutique DSP to the bottom/folded up piece. Attach the Basic White flower (again this is cut using the same Around the Bend dies) with the Fresh Freesia center using a Dimensional. Slip the 2 leaf dies under the flower, attaching them with a small amount of glue. Finish with a large and medium sized Fresh Freesia Opaque Adhesive Gems--notice they come in 3 sizes! And you are done.


.JPG)


Comments
Post a Comment