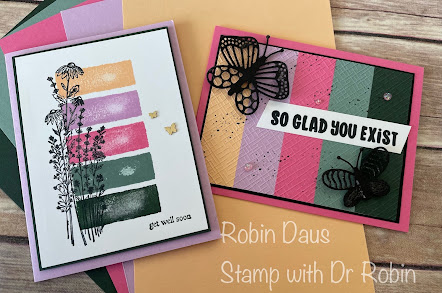
Retiring In Colors 2021-23
As most of you know, our In Colors change every 2 years and as of May 1st 2023 the 2021-23 In Colors will be retiring, unless some of them have made it into the Color Refresh in the new Annual Catalog that starts May 2nd. These retiring colors have been my favorite group of In Colors since I started as a demonstrator 6 years ago. I just love all of them, so am hoping some of them stick around. If you watch my Facebook Live below, I made both of these cards and gave more tips on using the Stamparatus, so please watch.
Let's make these cards! Gather your supplies for card 1 on the left (see below for the other one)
1.Fresh Freesia cardstock--Card base 5 1/2 by 8 1/2" scored on the long side at 4 1/4" and folded along the score line.
2. Basic White cardstock--2 pieces cut 3 3/4 by 5" for the inside and outside
3. Evening Evergreen cardstock--cut 3 7/8 by 5 1/8"
4. Stamp Sets--Watercolor Shapes (#156968), Dragonfly Garden (#154411),Through it Together (#155796), and Best Butterflies (#159114)
5. Ink--Memento Black, Pale Papaya, Fresh Freesia, Polished Pink, Soft Succulent and Evening Evergreen
6. Brushed Brass Butterflies (#158136)
7. Basic supplies--bone folder, Paper Snips, adhesive (I like Multipurpose Glue), Regular Dimensionals, Paper Trimmer, Stamparatus, Die Cutting and Embossing Machine for the second card
Start by taking one of the Basic White pieces of cardstock and the middle sized stamp of the 3 rectangles in the Watercolor Shapes stamp set. I started at the top with Pale Papaya ink and stamped it about 3/4" from the top, centering it. Clean your stamp between each color and stamp the rest of the In Colors as listed above, leaving a small space between them. As the stamp is photopolymer, it is easy to line them up.
Stamp a greeting in Evening Evergreen from the Through it Together stamp set--if you don't have this stamp set please check it out as it has some wonderful greetings for both the inside and outside of cards.
Use your Stamparatus and Memento ink to stamp the large group of flowers from Dragonfly Garden on the side of the color blocks. Using the Stamparatus is helpful to get a dark image. Attach this page to the Evening Evergreen cardstock. I attached it to the card using Dimensionals and added a large and small Brushed Brass Butterflies.
For the inside of both cards I stamped the group of little butterflies from Dragonfly Garden in Memento Black as below:
Now to make the second card on the right.
1.Polished Pink cardstock--Card base 5 1/2 by 8 1/2" scored on the long side at 4 1/4" and folded along the score line.
2. Basic White cardstock-- 2 pieces cut 3 3/4 by 5" for the inside and under the strips of In Colors, 3rd piece is a strip 3/4" by 5" for the sentiment
3. Basic Black cardstock--cut 3 7/8 by 5 1/8", some for cutting out the 2 butterflies
4. Strips of ALL of the 2021-23 In Colors each cut 1 by 3 3/4"
5. Stamp Sets--Best Butterflies (#159114 or #159120 for the bundle), Dragonfly Garden (#154411) for the inside, Forever Fern (#152559) for the dots
6. Dies--Build a Butterfly (#159119 or #159120 for the bundle)
7. Embossing Folders--Basics 3D Embossing Folders (#161598) for 3 of them
8. 2021-23 In Color Opal Rounds
9. Ink--Memento Black
10. Foam Adhesive Strips
11. Wink of Stella
Use the Stamparatus to stamp the sentiment on the 3/4" strip of Basic White, then cut the ends diagonally. Attach that to the front of your card.
Attach the 2 butterflies (cut using the Build a Butterfly dies) with Foam adhesive strips. Scatter 3 of the 2021-23 In Color Opal Rounds on the card. You can't see it on the pictures, but I used some Wink of Stella on the butterfly wings. The inside is the same as the card above.
Below is my Facebook Live from 3/27/23 where I make this card and show you some tips to help with the cardmaking. Join me every Monday at 1 pm PST for some cardmaking fun over on Stamp with Dr Robin on Facebook. Or follow me on YouTube with the same name (be sure to hit the Subscribe button while you are there).
Happy Stampin',
Robin


.JPG)


Comments
Post a Comment