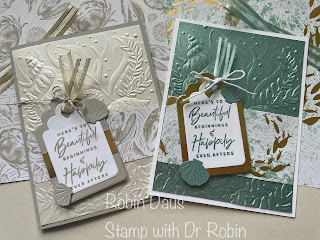
Something Fancy Wedding Card
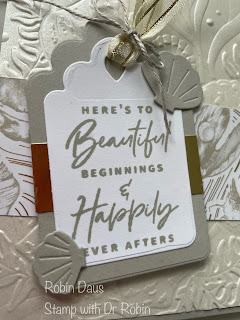
I fell in love with the dies from Something Fancy as soon as I saw them in the Jan-April Mini Catalog and was only going to buy the dies. And then later I went back for a second look at the stamp set and there are some amazing sentiments in this set as you can see above. I also wanted to show how the By the Bay paper also coordinates well with the Friends are like Seashells set and embossing folder. And don't get me started on the Pearlescent Specialty Paper on the left and the Soft Succulent Shimmer paper on the right--they really do shimmer in the light that you may not be able see on the picture.
Let's make the card on the left, and then I will let you know about what you need for the card on the right. Gather your supplies:
1. Sahara Sand cardstock--Card base 5 1/2 by 8 1/2" scored on the long side at 4 1/4" and folded along the score line. Another piece cut from the larger Something Fancy tag. Die cut 1 large and 1 small shell using the Seaside Bay dies.
2. Pearlescent Specialty Paper (#154291 from the Annual Catalog)--cut 4 by 5 1/4".
3. Basic White cardstock--Die cut from the small tag and the hole at the top. Inside piece 3 3/4 by 5".
4. By the Bay DSP (#160434)--1 1/2 by 4"
5. Gold Foil--3/4 by 2"
6. Stamp Set--Something Fancy (#160416), Seaside Bay (#160436 or 160445 for the bundle)
7. Dies--Seaside Bay (#16044 or 160445 for the bundle) and Stylish Shapes (#159183)
8. Embossing Folder--Seashell Embossing Folder
9. Ribbon--Satin Edged Ribbon (#159555) and Linen Thread (#104199)
10. Ink--Sahara Sand
11. Basic supplies--bone folder, Paper Snips, adhesive (I like Multipurpose Glue), Regular Dimensionals, Die Cutting and Embossing Machine, Paper Trimmer
Here is the card we are gong to focus on making today. I love using white or vanilla for wedding cards and that what I set out to do here. Fold the Sahara Sand card base in half along the score line. Run the Pearlescent Specialty Paper through the Die Cutting and Embossing Machine inside the Seashell Embossing Folder. Attach this to the front of your card base using Multipurpose Glue as this works well with the bumps after embossing it. Then attach the By the Bay strip.
For the inside, stamp the little seashells in the sand from Seaside Bay in Sahara Sand ink to the bottom of the Basic White and then attach to the card.
Below is my Facebook Live from 3/6/23 where I make this card and show you some tips to help with the cardmaking. Join me every Monday at 1 pm PST for some cardmaking fun over on Stamp with Dr Robin on Facebook. Or follow me on YouTube with the same name (be sure to hit the Subscribe button). Happy Stampin'
Robin


.JPG)


Lovely card! I was gifted a SU Seashells 3D Embossing Folder and was having the hardest time finding ideas that I liked. Yours was a winner for me!
ReplyDelete