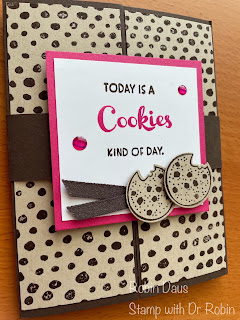
Nothing's Better Than Cookies
I was so excited to finally crack open the Nothing's Better Than bundle that has been in my possession for probably a year and I've never used until now. This set is so cute for the cookie, chocolate, coffee or cocktail lovers in your life--and there are great dies with these words on them too!
Let's make this card! Gather your supplies:
1.Early Espresso cardstock--Card base 5 1/2 by 8 1/2" scored on the long side at 2 1/8" from either side, and folded inward along the score line. Another piece 1" by 10" for the belly band
2. Basic White cardstock--2 pieces one cut 3 3/4 by 5" for the inside and one cut 2 3/4 by 2 3/4"
3. Melon Mambo cardstock--cut 3 by 3"
4. Crumb Cake cardstock--4 by 5 1/4", a scrap for the cookies
5. Stamp Sets--Nothing's Better than (#152507), Hand-Drawn Dots (#160508)
6. Dies--Love You More Than (#152698)
7. Ink--Early Espresso and Melon Mambo
8. Glossy Dots Assortment (#158827)
9. Early Espresso Ribbon (3152472)
10. Basic supplies--bone folder, Paper Snips, adhesive (I like Multipurpose Glue), Regular Dimensionals, Paper Trimmer, Stamparatus, Die Cutting and Embossing Machine, Tear 'N Tape
To make the front of the belly band, start with the 2 3/4" square of Basic White. On your block, place the 3 different sentiments on the block like below. Then take off the "Cookies" stamp and stamp the other 2 in Early Espresso. Stamp the "Cookies" on a separate block using Melon Mambo ink. Stamp 2 of the cookies on Crumb Cake cardstock using Early Espresso ink and cut them out with the dies. Now put it all together. Mount the stamped piece on the Melon Mambo square. Fold about 3" of Early Espresso Ribbon in half and cut the ends on a diagonal. Attach them to the bottom front with Tear 'N Tape and then attach the cookies--the one on the left with a Dimensional. Put a couple of Melon Mambo Glossy Dots on the front.
For the inside, stamp the sentiment and cookie as below and attach to the inside.
To finish the card, wrap the 1" belly band around the card, overlapping the ends in the front and securing it with Tear 'N Tape or Multipurpose Glue. Don't fold it too tight as the receiver will need to be able to get it off easily. Use Dimensionals to attach the sentiment square.
Below is my Facebook Live from 4/3/23 where I make this card and show you some tips to help with the cardmaking. Join me every Monday at 1 pm PST for some cardmaking fun over on Stamp with Dr Robin on Facebook. Or follow me on YouTube with the same name (be sure to hit the Subscribe button while you are there).
Happy Stampin',
Robin


.JPG)


Comments
Post a Comment