
Sneak Peek of Cheerful Daisies bundle
I am so, so excited to share with you the new Cheerful Daisies bundle from the 2023-24 Annual Catalog. If you area demonstrator, you can order a select number of items from the new catalog now (yet another reason to join now), or if you are a customer, you can order starting May 2nd. If you aren't already working with a demonstrator and would like a new catalog, drop me an email at stampwithdrrobin@gmail.com.
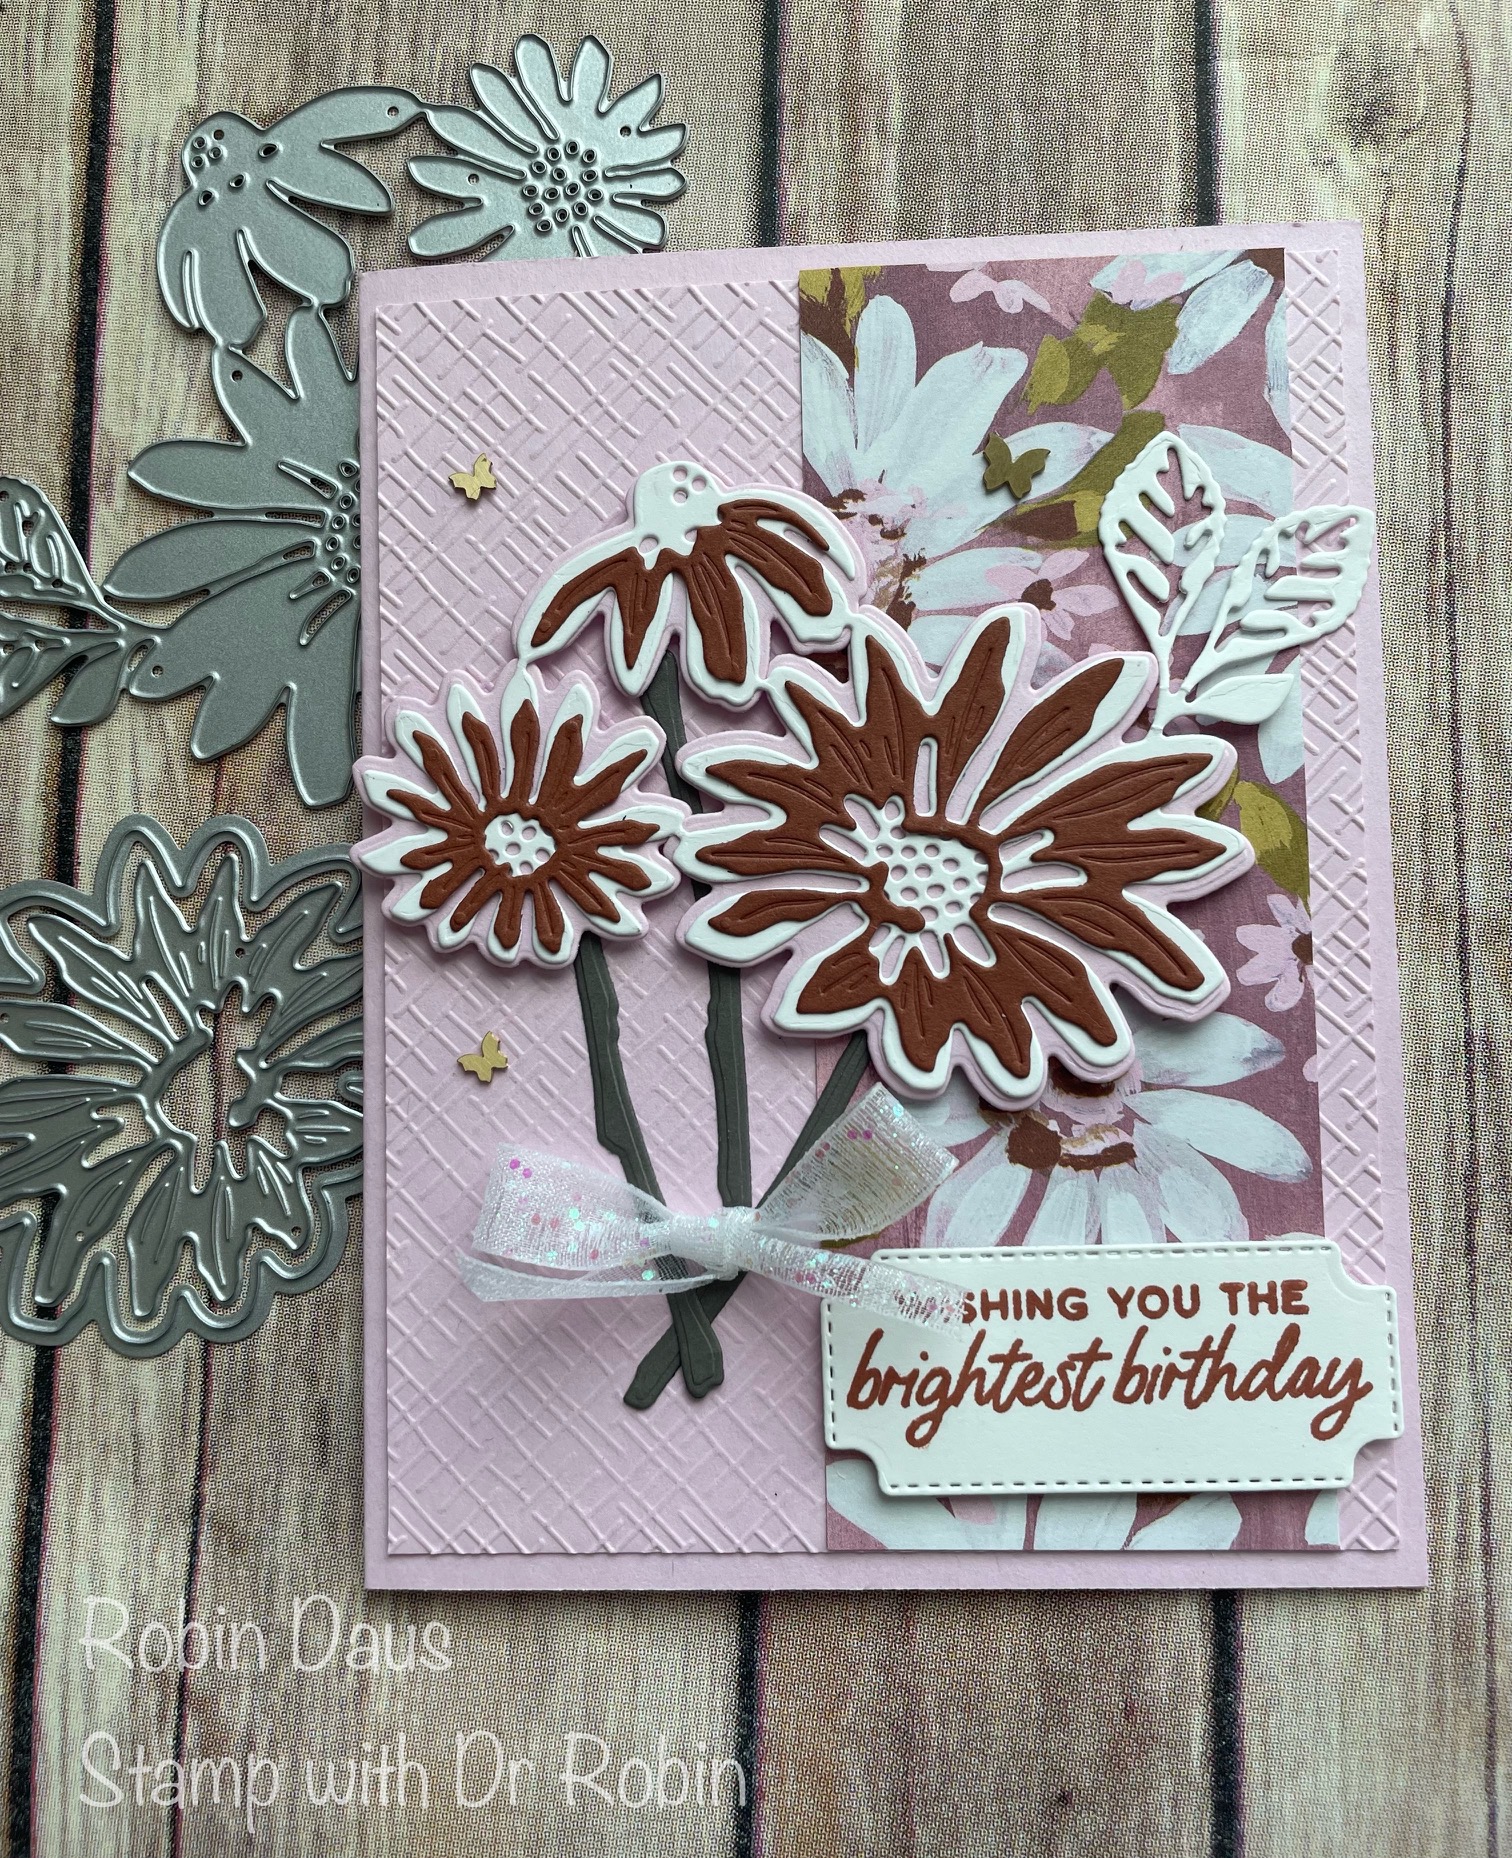
You are going to love this new set--it includes some 2 step stamping, some lovely sentiments and these amazing dies that I have highlighted on my card today. Please watch my Facebook Live video below to get some tips and tricks for using these dies. And then join me most Mondays at 1 pm PST for more Facebook lives.
I almost forgot to mention the new Fresh as a Daisy Designer Series Paper (DSP)--you can see a little piece of it in the background. I took my inspiration for this card and the colors from the DSP to make this card.
Let's make this card! Gather your supplies
1. Bubble Bath (a new core color) cardstock--Card base 5 1/2 by 8 1/2" scored on the long side at 4 1/4" and folded along the score line. A second piece 4 by 5 1/4" and some scraps for the back part of the daisies
2. Basic White cardstock--3 3/4 by 5" for the inside and a piece about the same side to cut the big die out, a scrap to cut the sentiment piece
3. Copper Clay cardstock--scraps to cut the most detailed daisy pieces
4. Pebbled Path cardstock--die cut 3 of the stems out of it
5. Fresh as a Daisy Designer Series Paper (DSP #161289)--2 by 5 1/4"
6. Stamp Set--Cheerful Daisies (#161290 of #161297 for the bundle)
7. Ink--Copper Clay and Moody Mauve (2 new In Colors)
8. Brushed Brass Butterflies (#158136)
9. Glittered Organdy Ribbon (#156408)
10. Basics 3D Embossing folders (#161598). This is an On-line Exclusives group of 3 Embossing Folders
11. Basic supplies--bone folder, Paper Snips, adhesive (I like Multipurpose Glue), Regular Dimensionals, Paper Trimmer, Glue Dots, Die Cutting and Embossing Machine, Silicone Mat

Fold your card base in half on the score line. Run the 4 by 5 1/4" piece of Bubble Bath through your Die Cutting and Embossing Machine inside the Basics 3D Embossing Folder that looks like cross hatches. Attach the piece of Fresh as a Daisy DSP to the right side of the embossed piece, leaving about 1/4" showing, then attach to your card front.
Attach the daisies using Dimensionals. Put glue on the back of the stems and slide them up under the raised daisies, making sure they group together at the bottom.
Finally, it's time to stamp. Use Copper Clay to stamp the sentiment on the included sentiment die. Attach to the front using Dimensionals. Use the 2 part daisy stamp and Moody Mauve ink on the 3 3/4 by 5" piece of Basic White as below. I stamped off the stamp that fills in the daisy before stamping it.

Finishing touch is to add a Glittered Organdy Ribbon bow attached with a glue dot. Scatter 3 Brushed Brass Butterflies and you are done. Here's another view of the card.

Below is my Facebook Live from 4/10/23 where I make this card and show you some tips to help with the cardmaking. Join me every Monday at 1 pm PST for some cardmaking fun over on Stamp with Dr Robin on Facebook. Or follow me on YouTube with the same name (be sure to hit the Subscribe button while you are there).
Happy Stampin',
Robin
.JPG)


Just found your demonstration here on phinterest and wanted to say thank you for sharing this beautiful card. Have just ordered the daisy dsp and worried that it might be too busy for me to use. Your card has shown me how to 'tame' it down. Again, thank you for sharing.
ReplyDelete