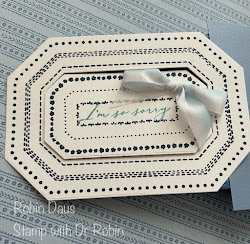
Countryside Inn Fun Fold
I have really enjoyed playing with the Countryside Inn Suite (found on page 62-63 in the 2023-24 Annual Stampin' Up Catalog), so much so that I have an upcoming class featuring this suite of products. This is one of the cards we will make on June 11th and if you want to take this class at home, please email me: stampwithdrrobin@gmail.com. This suite consists of a large stamp and a set of dies that can be used with the stamp, but will also be great on its own for so many uses. As the Countryside Corners bundle has no sentiments, I also used the Lasting Joy stamp set found on page 64. I bought it for the sentiments, then noticed not only do they fit in the Countryside Corners stamp, but the flowers in Lasting Joy actually match those in the Countryside Inn Designer Series Paper--who knew? I learned this fun fold from watching Ronda Wade at Creating Success with Ronda Wade.
Let's make this card! Gather your supplies
1. Boho Blue cardstock--Card base 4 1/4 by 11" scored on the long side at 5 1/2" and folded along the score line. A second piece cut from the largest Countryside Corners die.
2. Whisper White cardstock--3 pieces. Use a quarter sheet (5 1/2 by 4 1/4") to stamp the front sentiment. For the inside cut a piece using the second largest Countryside Corners die and a scrap piece for the flowers on the front.
3. Countryside Inn DSP -1 piece for the front cut 4 by 3 3/4" and a second piece for the inside 2 by 4".
4. Stamp Sets--Countryside Corners and Lasting Joy
5. Dies--Countryside Corners
6. Ink--Misty Moonlight and Balmy Blue
7. Adhesive-Backed Sequin Trios
8. Variegated Ribbon
9. Basic supplies--bone folder, Paper Snips, adhesive (I like Multipurpose Glue), Regular Dimensionals, Paper Trimmer, Glue Dots, Die Cutting and Embossing Machine
Let's start with the stamping. Stamp the entire Countryside Corners stamp in Misty Moonlight on the quarter sheet of Whisper White. Stamp a sentiment from Lasting Joy in Balmy Blue in the center of the large stamp. Using the largest and the 4th largest Countryside Corners dies to cut out the sentiment piece and the rest of the stamp. Notice you can then use the outside part on another card.
Stamp the large flower from Lasting Joy in Misty Moonlight stamped off all over the large Boho Blue die cut. Use Balmy Blue to stamp the 4 small flowers on to the Whisper White scrap, then use Misty Moonlight to stamp the matching stems. Fussy cut the flowers out.
Now stamp the inside using Misty Moonlight (full strength and then stamped off) and the same large flower from Lasting Joy. I used Balmy Blue for the sentiment.
Let's put this card together. Take your card base and cut 1 1/2" off the front and then fold it. Score the large Boho Blue die cut from the top the to the bottom corner and then fold it under and attach to the right side of the card base on the inside (see my finger below), making sure the stamped part is on the outside and the fold lines up with the right side of the card base and is centered up and down. Please watch my Facebook Live video below to see how to do this. And join me every Monday at 1 pm PST to watch me make a new card--we have a lot of fun.
Cover the piece you just glued on with the 2 by 4" piece of Countryside Inn DSP. Use the larger piece of DSP on the front flap. Attach the stamped die cut of Whisper White to the inside--don't you just love how you can use this die for the inside of your card?
Attach your sentiment piece to the flap you just created using Dimensionals--be sure to attach it a bit to the right, don't center it. Use more Dimensionals to attach the little flowers, making sure to only put the Dimensionals on the left side of the flower piece. Attach it to the card base with the flowers overlapping the die cut flap to hold it in place. Again, watching the video will help you understand what I mean.
Scatter 3 Adhesive-Backed Sequin Trios in white to the front--I used 2 small and 1 larger one. Tie a small bow with the Variegated Ribbon and attach it with a glue dot.
Below is my Facebook Live from 5/29/23 where I make this card and show you some tips to help with the cardmaking. Join me every Monday at 1 pm PST for some cardmaking fun over on Stamp with Dr Robin on Facebook. Or follow me on YouTube with the same name (be sure to hit the Subscribe button while you are there).
Happy Stampin',
Robin


.JPG)


Comments
Post a Comment