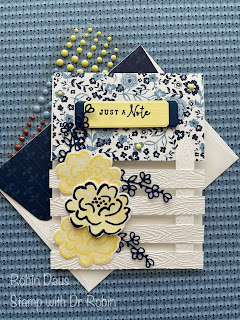
Countryside Corners Lattice Card
I know many of you are intimidated by this lattice card, and frankly, so was I when I first saw it, but it is actually quite easy. I used several different sets to make this card as well as the Countryside Inn Designer Series paper. I will put all the directions here, but you can also watch me make it on my Facebook live that is attached below. I go live every Monday at 1 pm PST and would love to have you join me. The Designer Series Paper I used for this card is on sale for the month of June at 15% off, so get it now! If you need any of these supplies, click on the red Robin to the left to go to my Stampin' Up store.
Let's make this card! Gather your supplies
1. Thick Basic White cardstock--Card base 4 1/4 by 11" scored on the long side at 5 1/2" and folded along the score line.
2. Whisper White cardstock--A piece big enough to stamp the 3 flowers
3. Lemon Lolly cardstock--a scrap to cut the smallest die from Countryside Corners (not the tiny flagged one)
4. Night of Navy cardstock--a scrap to cut the smallest die from Countryside Corners, same as above and 3 of the flower sprigs from Darling Details
5. Countryside Inn DSP -- for the front cut 4 1/4" by 2 1/2". I also used some for the envelope flap
6. Stamp Sets--Darling Details
7. Dies--Countryside Corners, Darling Details,
8. Ink--Lemon Lolly and Night of Navy
9. Timber 3D Embossing Folder
10. Adhesive-Backed Solid Gems
11. Basic supplies--bone folder, Paper Snips, adhesive (I like Multipurpose Glue), Regular Dimensionals, Paper Trimmer, Glue Dots, Die Cutting and Embossing Machine
Fold your card base along the score line. Using your Paper Trimmer, cut six 1/2" strips off the bottom of the front of your card (they should each be 1/2" by 4 1/4"). Run them through your Die Cutting and Embossing machine inside the Timber 3D Embossing Folder. Take 2 of them and cut one end into a point. Attach the Countryside Inn DSP to the front flap of the card, then attach the point of your fenceposts to the card about 1/4" from each of the sides. Use your grid paper to help you keep them straight. Notice I just have them peek a little over the DSP--this means you will need to trim off the bottom of your fence posts. Do this by closing the card and make the posts even with the back of the card.
To attach the horizontal fence posts, this is much easier to line them up using your grid paper. Attach the first one to the bottom even with the bottom back of your card with the sides lined up with the sides. Now open the card up and attach the other 3--notice they are each spaced 1/4" apart which is the same as one box on your grid paper! Amazing how that works out.
Now let's do some stamping. Using Night of Navy, stamp your sentiment on the little Lemon Lolly die cut piece. Cut the same sized Night of Navy die cut in half down the center, separate those 2 pieces and attach them to the back of your sentiment piece, making sure they are the same amount sticking out on both sides.
To stamp the flowers I used the outline flower full strength and the filler piece stamped off Lemon Lolly. 2 flowers used just the Lemon Lolly and one in Night of Navy for the outline. Die cut them using the Darling Details dies. Arrange them on your fence and then add in the 3 Night of Navy sprigs, making sure they are sitting on a fence piece so you can stick them down. Remove the flowers, stick down the sprigs first. I then glued down the 2 Lemon Lolly flowers (easier to put the glue on the fencepost than the flower) and then popped the Navy one up on some Dimensionals, again making sure they only touch the fence.
Below is my Facebook Live from 6/5/23 where I make this card and show you some tips to help with the cardmaking. Join me every Monday at 1 pm PST for some cardmaking fun over on Stamp with Dr Robin on Facebook. Or follow me on YouTube with the same name (be sure to hit the Subscribe button while you are there).
Happy Stampin',
Robin


.JPG)


Comments
Post a Comment