
Fun Folds to Inspire You to Use Your DSP

For the entire month of June, 2023 Stampin' Up is having a 15% off sale on 13 different packages of Designer Series Paper from the Annual Catalog. So today I thought I would show you 2 ideas on ways to use some of our wonderful DSP. I will have to say, the Fresh as a Daisy DSP is my favorite in the Annual Catalog, so that is why I chose to use it for these two cards.
Let's make these two cards! I will call the one on the left above card 1 and the one on the right, card 2. Gather your supplies:
1. Fresh as a Daisy Designer Series paper. Card 1--11 3/4 by 5 1/4". Card --12 by 5 1/2"
2. Basic White cardstock--3 3/4 by 5" for the inside for card 1, and 3 3/4 by 5 1/4" for card 2. A scrap for the flower and a piece to cut the sentiment piece from the 3rd largest Nested Essentials rectangle
3. Pebbled Path cardstock 4 1/4 by 5 1/2" for card 1 only
4. Lemon Lolly cardstock--piece cut from the 2nd largest Nested Essentials rectangle
5. Stamp Sets--Cheerful Daisies
6. Dies--Nested Essentials and Cheerful Daisies
7. Ink--Pebbled Path and Lemon Lolly
8. Glittered Organdy Ribbon
9. Adhesive-Backed Solid Gems (in Lemon Lolly)
10. Lemon Lolly Dark Blender Pen
11. Basic supplies--bone folder, Paper Snips, adhesive (I like Multipurpose Glue), Regular Dimensionals, Paper Trimmer, Glue Dots, Die Cutting and Embossing Machine
For card 1 score the DSP at 4, 7, and 10". Fold in on the 4" score, out on the 7" and in on the 10" score. Make sure that your paper either doesn't have an orientation, or, like this DSP, you check it first before you cut it that it will be going in the correct orientation. Attach it to the 1/4 sheet of Pebbled Path cardstock.
For card 2 score the DSP at 2,4 8 and 10". Fold in on the 2 middle score lines, and outward on the 2 outer ones. Then use a pencil to mark 1 1/2" up from the bottom on each short side. Now cut from the 1 1/2" mark to the TOP of second fold on each side (you will cut off a triangle). If you don't understand this, please watch my Facebook Live below and it will be clearer.

Now let's start stamping--this is the same for both cards. Using Pebbled Path ink, stamp the sentiment on the Whisper White rectangle. Use the 3 daisies stamp and Lemon Lolly ink stamped off and stamp this twice over your sentiment. Attach this to the Lemon Lolly Nested Essentials rectangle. Take a scrap of Whisper White cardstock and stamp the outline of the small daisy with full strength Lemon Lolly and the inside petals in stamped off Lemon Lolly. Cut it out with its matching dies. Attach to the sentiment piece and attach to the front of your card with Dimensionals along only the left side of back (or you will stick your card together).
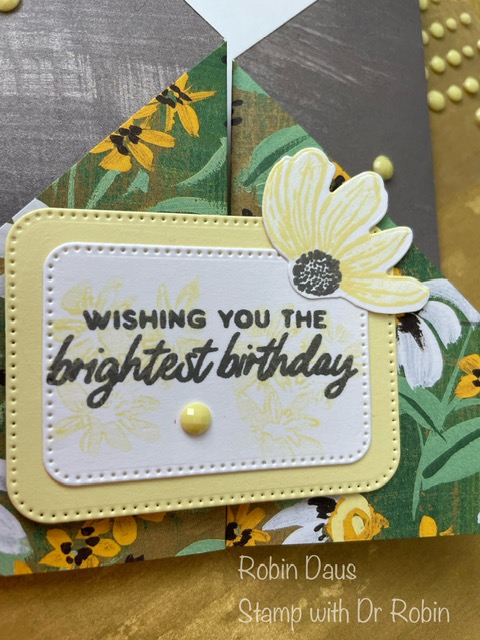
For the inside pieces, stamp the flower as you did for the front and attach the inside piece to the inside of your card. Be sure you know what will be showing with the card closed--I chose to have them NOT see the inside stamped flowers with the card closed, but you can do whatever you want. Insides:


Now just pretty up the outside. I added 3 Lemon Lolly Adhesive-Backed Solid Gems to each card. For the first card I also colored some Glittered Organdy Ribbon with my Dark Lemon Lolly Blend, then tied it around the front of the card and we are done!


Below is my Facebook Live from 6/5/23 where I make this card and show you some tips to help with the cardmaking. Join me every Monday at 1 pm PST for some cardmaking fun over on Stamp with Dr Robin on Facebook. Or follow me on YouTube with the same name (be sure to hit the Subscribe button while you are there).
Happy Stampin',
Robin
.JPG)


Comments
Post a Comment