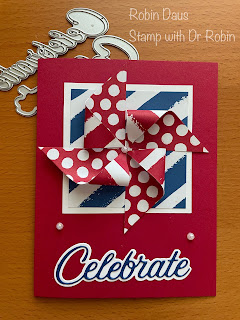
Patriotic Pinwheel Card
As it is close to 4th of July here in the USA, I thought it would be great to make a card to celebrate that holiday, that could be also be used to celebrate a birthday near this holiday, or really for any occasion you want to celebrate. I also have an upcoming class to make a 12" by 12" patriotic sampler for framing and am using this pinwheel for one of the elements on my sampler.
Let's make this card! Gather your supplies
1. Real Red cardstock -Card base 5 1/2" by 8 1/2" scored on the long side at 4 1/4" and folded along the score line.
2. Basic White cardstock--3 3/4" by 5" for the inside, a piece 3" by 3", and a scrap piece to cut the larger sentiment die
3. Blueberry Bushel cardstock--scrap about 1" by 3" for the sentiment
4. Regals 6" by 6" DSP--The Blueberry Bushel one cut 2 3/4" by 2 3/4" and 2 pieces of the Real Red each cut 2" by 2".
5. Stamp Sets--Beautiful Balloons
6. Dies--Wanted to Say
7. Ink--Blueberry Bushel
8. Iridescent Pearls Basic Jewels
9. Adhesive Sheets--Cut 1" by about 3"
10. Basic supplies--bone folder, Paper Snips, adhesive (I like Multipurpose Glue), Paper Trimmer, Glue Dots, Die Cutting and Embossing Machine
Let's start by making the pinwheel. Cut each of the 2" pieces of Real Red Regals 6" by 6" DSP in half corner to corner making 4 right angled triangles. Place all 4 triangles in the same position on your card-making surface--I put all the right angles to the right. Attach a smushed up Glue Dot to the lower left point of the triangle and attach it to the right angled corner as below. Do the same with all 4 triangles. If you are getting lost now, please watch my Facebook Live video below as it will show you how to do this.
Now take the 2 3/4" square of Blueberry Bushel DSP and fold it in half both directions (just normally, not on the diagonal). So fold it in half one way, unfold it, then fold it in half the other way so you now can see the fold lines making it 4 small squares. Take one of your folded triangles and place the long (unfolded edge) along one of the lines and glue it down. Do the same for the other 3. You will need to let it dry a bit and then attach it to the 3" white square.
For the inside, I stamped some of the party elements from Beautiful Balloons in the corners and attached it to the card base.
Here's another view of your finished card:
Below is my Facebook Live from 6/26/23 where I make this card and show you some tips to help with the cardmaking. Join me every Monday at 1 pm PST for some cardmaking fun over on Stamp with Dr Robin on Facebook. Or follow me on YouTube with the same name (be sure to hit the Subscribe button while you are there).
Happy Stampin',
Robin


.JPG)


Comments
Post a Comment