Darling Details for Christmas!
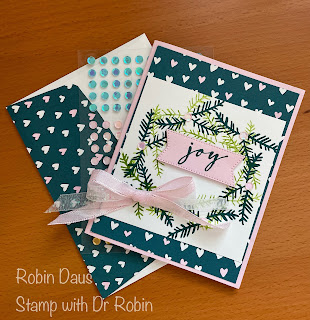
OK, maybe I'm a little too obsessed with the Darling Details set, but last week when I did the Fresh Freesia card, I used this stamp that looked like a pine bough to me. And then I wondered if I could use that same stamp to make a wreath. And guess what, with a little practice, it came out perfect and a Christmas in July card came to life! I realize that Pretty Peacock and Bubble Bath are not your usual Christmas card colors, but I just love them together and love this card.
We will start with the stamping on the 3 7/8" Basic White square. Start at the top and stamp the pine bough in Pretty Peacock. Stamp around in a circle, keeping the stamp in the same direction. Clean your stamp and stamp again in STAMPED OFF Granny Apple Green/Parakeet Party using the stamp in the opposite direction (so instead of the part with one bough to the left, turn it so that the one bough to the right). Stamp all around the circle again, trying to have the Granny Apple Green/Parakeet Party boughs not be right on top of the Pretty Peacock ones.
Stamp the sentiment from Brightest Glow stamp set on the Bubble Bath cardstock cut with the short, fat flagged Stylish Shapes die.
Fold your card base in half. Attach the piece of Delightfully Eclectic DSP to the card base and then the wreath in the middle. Color some more of the hearts with your Bubble Bath Blend.
Tie a bow using both the Glittered Organdy and Sheer Ribbon in Bubble Bath. Attach that to the wreath using a Glue Dot. Now scatter 5 of the pink Pastel Adhesive-Backed Sequins around the wreath (I put them in the center of the 3 Pretty Peacock boughs. Attach the sentiment piece with Dimensionals.
For the inside, I stamped a couple of the boughs as below. I also used a 2 1/2" by 6" piece of the DSP attached to the back envelope flap and you can see that in the top picture.
Below is my Facebook Live from 7/31/23 where I make this card and show you some tips to help with the cardmaking. Join me every Monday at 1 pm PST for some cardmaking fun over on Stamp with Dr Robin on Facebook. Or follow me on YouTube with the same name (be sure to hit the Subscribe button while you are there). And let me know if you have questions. You can click on the red Robin above left to order from my store.
Robin


.JPG)


Comments
Post a Comment