
Darling Details in Fresh Freesia
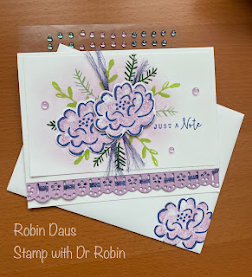
I've been a little obsessed with the Darling Details bundle lately. I'm just loving the dies (notice the edging one above) as well as the flowers and leaves. I keep trying different combinations to make the flowers, and this Fresh Freesia and Orchid Oasis one is just so beautiful. If you love this set as much as I do, come take my class with this bundle next month.
Dates for Darling Details in person class: Either 8/18 at 10 am or 8/20 at 1:00 pm at my house
Class choices:
Option 1: Includes 4 cards and envelopes, Darling Details stamp set and dies, 1/2 package of Bright & Beautiful DSP, 1/2 package of Opaque Ovals Embellishments: $77 (class is free!!) and you get a $5 bonus day coupon if we can order by 7/31
Option 2: Includes 4 cards and envelopes, Darling Details stamp set, 1/2 package of Bright & Beautiful DSP, 1/2 package of Opaque Ovals Embellishments: $50 (that's $15 off the class)
Option 3: Includes 4 cards and envelopes, 1/2 package of Bright & Beautiful DSP, 1/2 package of Opaque Ovals Embellishments: $25
Add $10 for the at home version of this class.
Or you can buy the PDF for $20.
Email me stampwithdrrobin@gmail.com if you are interested. Orders need to be in and paid for by 7/31/23
Now Let's make this card! Gather your supplies
1. Thick Basic White cardstock --Card base 5 1/2" by 8 1/2" scored on the long side at 4 1/4" and folded along the score line. Then cut 3/4" off the front of the card.
2. Basic White cardstock--3 1/4" by 5 1/4"
3. Fresh Freesia cardstock--1" by 5 1/2" piece and a second piece 1/2" by 5 1/2"
4. Stamp Sets--Darling Details
5. Dies--Darling Details
6. Ink--Fresh Freesia, Orchid Oasis, Parakeet Party and Garden Green
7. Tinsel Gems Three-Pack
8. Ribbon--Orchid Oasis Metallic Woven Ribbon
9. Basic supplies--Large Blending Brush, bone folder, Paper Snips, adhesive (I like Multipurpose Glue), Paper Trimmer, Tear 'N Tape, Take Your Pick Tool, Die Cutting and Embossing Machine
Start by die cutting the 1" piece of Fresh Freesia cardstock with the long edging die. Then weave the Orchid Oasis Metallic Woven Ribbon through the holes as below--check out my Facebook live below to see how I did this using my Take Your Pick Tool. Use a small piece of Tear 'N Tape to secure it to the back. Attach this strip to the long cut edge of the front of your card. Then take the 1/2" of Fresh Freesia cardstock and glue it to the back/inside of the strip, just covering where you placed your Tear 'N Tape to hold down the ribbon.


Now we are ready to stamp. Stamp the outline of the big flower using Orchid Oasis ink and then the inside with stamped off/second generation Fresh Freesia. Die cut these flowers.
Take the 3 1/4" by 5 1/4" piece of Basic White in the landscape position. Using the Blending Brush, lay down a light layer of Fresh Freesia ink in the center. Stamp your sentiment in Orchid Oasis on the right side. Check where you are going to place your flowers, then use Parakeet Party and the leaf branch and stamp 5 branches around the center. In between them use Garden Green ink and the pine branches to stamp in between the other leaves--some I did full strength, some stamped off and some with the side facing out with the 2 boughs and some I turned the other way so that there was just 1 bough facing out.
Cut two 3" pieces of the Orchid Oasis Metallic Woven Ribbon and fray both sides. Cross the ribbon and attach in the center with Tear 'N Tape (or you could use Stampin' Seal + also). Attach one flower with glue and the other with Dimensionals.
For the inside, I just stamped the leaf bough twice without re-inking, as above right.


Now take 2 large and 1 small of the Fresh Freesia Tinsel Gems and scatter them on the front and you are done. Don't forget to decorate your envelope--I used the pretty flower to do that on mine.

Below is my Facebook Live from 7/24/23 where I make this card and show you some tips to help with the cardmaking. Join me every Monday at 1 pm PST for some cardmaking fun over on Stamp with Dr Robin on Facebook. Or follow me on YouTube with the same name (be sure to hit the Subscribe button while you are there). And let me know if you have questions. You can click on the red Robin above left to order from my store.
Happy Stampin',
Robin
.JPG)


Beautiful card today. Love the colors and the scalloped edge die. Enjoy your day!
ReplyDelete