Fragrant Forest Sneak Peek
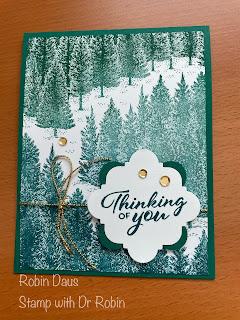
I have another wonderful sneak peek today from the spectacular Sept-Dec Mini Catalog! The large background stamp Fragrant Forest is so detailed and beautiful, and so easy to make a quick card with it. The details of the trees are amazing--like you really could smell the fragrance of a pine forest through the image. I don't know if you can tell from the picture, but I actually used 3 different greens to make the trees. I will try to describe here how I did this on one stamp set, but it might help to watch my Facebook Live below (or on my Stamp with Dr Robin YouTube channel). And then you get the added benefit of seeing the terrific swaps I received from my leadership conference also.
Let's make this card! Gather your supplies:
1. Shaded Spruce cardstock --Card base 4 1/4" by 11" scored on the long side at 5 1/2" and folded along the score line. Second scrap for punching the piece behind the sentiment
2. Basic White cardstock-- 2 pieces, one 4" by 5 1/4", a second piece 3 3/4" by 5" for the inside and a scrap to punch the sentiment piece.
3. Stamp Sets--Fragrant Forest (from the new Sept-Dec Mini Catalog), Layering Leaves
4. Punch--Handmade Tags
5. Ink--Shaded Spruce, Lost Lagoon and Pretty Peacock
6. Pastel Adhesive-Backed Sequins
7. Simply Elegant Trim
8. Basic supplies--Bone folder, Paper Snips, adhesive (I like Multipurpose Glue), Paper Trimmer, Take Your Pick Tool, Regular Dimensionals, Blending Brush
Start by stamping with the large Fragrant Forest stamp--you will need an F block for this stamp. For this card, I inked up the bottom trees on the stamp with Pretty Peacock ink by placing the stamp faced up on my desk. Then I inked up the top trees with Shaded Spruce--don't worry if some of the ink gets on the trees below--that's part of what makes it look good. Then using a Blending Brush (or a Sponge Dauber), add Lost Lagoon to the trees in the middle. I then tool my Blending Brush and mixed the colors a bit where they met (again watch the video). Wash off this stamp set well so you can use it for the inside of your card.
Now punch a Basic White Handmade Tag and stamp the sentiment from Layering Leaves using Pretty Peacock. Attach it to the Shaded Spruce tag, offsetting them as below.

For the inside, after washing off the stamp set well, I inked it up again, just using Shaded Spruce on the bottom trees. I had to wipe off some of the bases of the trees below before stamping on the bottom of the inside Basic White piece. Then attach that to the inside of your card.
Wrap the gold Simply Elegant Trim around your front piece and tie a bow. Now attach it to the front of your card. Attach the sentiment piece using Dimensionals and sprinkle 1 large and 2 small gold Pastel Adhesive-Backed Sequins around your card. Here's another card I made the same way, but this one has Pretty Peacock on the top and Shaded Spruce on the bottom trees--this is actually the one I made on my Facebook Live. Enjoy!
Below is my Facebook Live from 8/28/23 where I make this card, and show you some tips to help with the cardmaking. Join me every Monday at 1 pm PST for some cardmaking fun over on Stamp with Dr Robin on Facebook. Or follow me on YouTube with the same name (be sure to hit the Subscribe button while you are there). And let me know if you have questions. You can click on the red Robin above left to order from my store.
Happy Stampin',
Robin


.JPG)


Robin, First time viewing. Saw your swap on Sue Stampfield's video. Are you really a Doctor? LOL.
ReplyDeleteLuv this tree card...well done! Replay from Chicago USA.