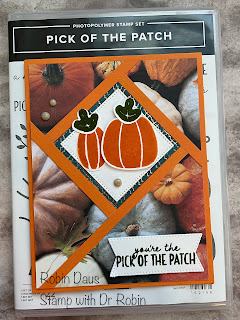
Sneak Peek of Pick of the Patch Bundle
I can't wait for you to see the new Sept-Dec 2023 Mini Catalog! It has so many amazing fall and holiday products. If you joined me last week on my Facebook Live/YouTube, you saw me display the upcoming new papers and a new mask set. Today I want to share a great punch bundle--Pick of the Patch. What I like best about this set is its versatility--it has multiple different sized pumpkins that also have vines and leaves as well as the ability to make a fall or Halloween card as it has a Happy Halloween sentiment and other great fall sentiments. And who doesn't like great fall DSP and the All About Autumn is just that! Here we will make a fractured (or some call it a shutter) card, which is a new technique for me. If you get stuck, please watch my Facebook Live attached below.
Let's make this card! Gather your supplies:
1. Pumpkin Pie cardstock --Card base 5 1/2" by 8 1/2" scored on the long side at 4 1/4" and folded along the score line. Second piece 4" by 5 1/4" and 3-4 pieces that are 1/4" wide and 6-11" long.
2. Basic White cardstock-- a piece 3 3/4" by 5", a piece cut with the second largest Stylish Shapes square, and a scrap for the sentiment (the bigger of the short, fat flagged dies) and for the pumpkins and leaves.
3. All About Autumn DSP cut 4" by 5 1/4"
4. Stamp Sets--Pick of the Patch (from the new Sept-Dec Mini Catalog)
5. Punch--Pick of the Patch (from the new Sept-Dec Mini Catalog)
6. Ink--Pumpkin Pie, Mossy Meadow
7. Dies--Stylish Shapes
8. Adhesive-Backed Speckled Dots
9. Basic supplies--Bone folder, Paper Snips, adhesive (I like Multipurpose Glue), Paper Trimmer, Glue Dots, Take Your Pick Tool, Die Cutting and Embossing Machine, Mini and Regular Dimensionals
Start by cutting the largest Stylish Shape square placed in a diamond on the All About Autumn DSP--place the corners the same distance from the top and the 2 sides. Turn over the square you just cut out and cut it down to 2 1/8" by cutting off all the stitching from the 4 sides. Now glue the DSP to the 4" by 5 1/4" piece of Pumpkin Pie. Center the 2 1/8" square inside the DSP and glue it down--make sure the back is what is showing. Glue the Basic White second largest Stylish Shapes square in the center of the other square.
Now let's add the 1/4" strips. Start by putting some glue on the outside of the Pretty Peacock (larger square) and keep extending the line of glue straight to the edge. The 1/4" piece starts even with the edge of the Pretty Peacock square as on the left picture below. You can see on the right picture how it extends to the edge of the DSP. You can now cut it flush with the edge, or wait to do all 4 at once. Then go to the second side of the square and do the same thing, as well as the other 2. Cut all the 1/4" pieces flush with the DSP.


Now let's stamp some pumpkins! I used Pumpkin Pie ink and stamped the largest pumpkin and punched him out with the punch. The long skinny one I had to fussy cut, but it was easy. I stamped 2 leaves in Mossy Meadow and punched them out with the punch. I glued the small pumpkin straight on to the Basic White square and popped up the big one using Dimensionals. Then I glued on the leaves--for the leaf on the big pumpkin I put a Mini Dimensional on the back of it.
I added 3 of the Adhesive-Backed Speckled Dots--a large one on the Basic White square and a small and large one on the DSP and you are done. Here's another picture of the card:
Here's another card I did with the same technique and DSP. I used the new/upcoming Oxidized Copper DSP to punch out the pumpkins and the new/upcoming Autumn Leaves stamp set and dies for the sentiment. I told you guys you were going to love this catalog! Let me know at stampwithdrrobin@gmail.com if you aren't working with a demonstrator and need a new catalog.
Below is my Facebook Live from 8/14/23 where I make this card and show you some tips to help with the cardmaking. Join me every Monday at 1 pm PST for some cardmaking fun over on Stamp with Dr Robin on Facebook. Or follow me on YouTube with the same name (be sure to hit the Subscribe button while you are there). And let me know if you have questions. You can click on the red Robin above left to order from my store.
Happy Stampin',
Robin


.JPG)


Comments
Post a Comment