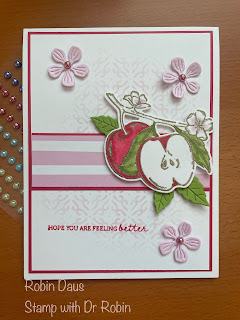
Apple Harvest Get Well Card
We are going to play with the Apple Harvest stamp set and the Apple Blossoms dies today. The stamp set is a beautiful one from the Annual Catalog, but the dies were an out-of-catalog promotion and can be found on the Clearance Rack now for only $14 (regularly $35). This is an amazing deal for 25 dies--some cut out the stamped images, and some, like the little Bubble Bath flowers and the leaves are stand alone dies. If you look closely at the background, you can also see I used a mask for the added dimension. I was inspired by a swap I received at my Leaders Convention in Las Vegas last weekend to make this card. See the lovely inspiration card by Sallie Fisher below. Hers was just stunning in person and I wanted to do something similar.
Let's make this card! Gather your supplies:
1. Thick Basic White cardstock --Card base 4 1/4" by 11" scored on the long side at 5 1/2" and folded along the score line. Second piece 3 7/8" by 5 1/8"
2. Basic White cardstock--One piece 3 7/8" by 5 1/8" and a scrap to stamp the apples
3. Sweet Sorbet cardstock--One piece 4" by 5 1/4" and a second piece 1 1/4" by 3 7/8"
4. Bubble Bath cardstock--Die cut 3 flowers
5. Granny Apple Green cardstock--Die cut 1 large and 2 small leaves
6. Delightfully Eclectic DSP--The pink striped piece is 1 1/8" by 3 7/8"
7. Stamp Sets--Apple Harvest
8. Foursquare Decorative Masks--I used the swirly one but you could use any mask
9. Ink--Bubble Bath and Sweet Sorbet
10. 2022-24 In Color Pearls
11. Blends--Light Bubble Bath, Light and Dark Sweet Sorbet, Light and Dark Granny Apple Green, Color Lifter
12. Embossing supplies--Embossing Buddy, Versamark, Heat tool, Gold Embossing Powder
13. Basic supplies--Bone folder, Paper Snips, adhesive (I like Multipurpose Glue), Paper Trimmer, Take Your Pick Tool, Piercing Mat, Cut and Emboss Machine, Regular Dimensionals, Blending Brushes, Mini Glue Dots
Start by using your mask and Bubble Bath ink and very, very lightly use your Blending Brush and lay down a light layer of ink on the 3 7/8" by 5 1/8" Basic White piece of cardstock--don't go all the way out to the edges. If you want some more tips/instruction watch my Facebook Live below. Attach this piece to the 4 by 5 1/4" piece of Sweet Sorbet and attach to the card front. Attach the piece of Delightfully Eclectic DSP to the other piece of Sweet Sorbet cardstock and attach that about 2" up from the bottom of the card.
Now on to the apples. First emboss them on Basic White--wipe your cardstock with your Embossing Buddy, stamp with Versamark, sprinkle with gold embossing powder and heat until melted with your Heat Gun. I used the above Blends to color it in (you can watch me color on my Facebook Live below). Here's a close up of the coloring on the apples.
Attach one large and one small Granny Apple leaves under where the apples will go. Attach the apples to the card with Dimensionals then attach the final small leaf under, or on top of, the whole apple. Attach 3 Bubble Bath flowers with Mini Glue Dots and then put 3 Sweet Sorbet 2022-24 In Color Pearls in the center of the flowers.
Below is my Facebook Live from 9/4/23 where I make this card, and show you some tips to help with the cardmaking. Join me every Monday at 1 pm PST for some cardmaking fun over on Stamp with Dr Robin on Facebook. Or follow me on YouTube with the same name (be sure to hit the Subscribe button while you are there). And let me know if you have questions. You can click on the red Robin above left to order from my store.
Happy Stampin',
Robin


.JPG)


Comments
Post a Comment