Christmas Classics Meet Shining
Christmas Specialty DSP
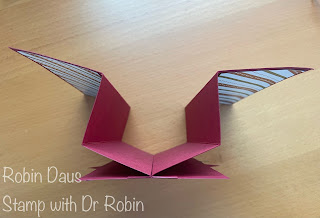
And here's a picture from the top for you to see why it is called the Flying Seagull fold. I learned how to make this from Sue Campfield--she is an amazing paper crafter that I follow.
Let's make this card!
1. Cherry Cobbler cardstock -Start with your paper in a portrait mode and cut it down to 5 1/2" by 11". Then cut that piece in half so you have two 5 1/2" squares. Take both of those and score each at 2", 3 1/2" and 5" and accordion folded along the score lines. Take your leftover piece and cut a piece 3" by 5 1/2" and another piece 2 3/4" square.
2. Basic White cardstock--Two pieces1 1/4" by 5 1/4", and a scrap piece to die cut the sentiment piece square from the Christmas Classics dies
3. Mossy Meadow cardstock--die cut 3 holly leaves using the Christmas Classics dies
4. Shining Christmas Specialty DSP--Cut the front panel 2 3/4" by 5 1/4" and two of the side panels from a different pattern 1 3/4 by 5 1/4"
5. Stamp Sets--Christmas Classics
6. Ink--Mossy Meadow
7. Iridescent Adhesive-Backed Discs
8. Basic supplies--bone folder, Paper Snips, adhesive (I like Multipurpose Glue), Paper Trimmer, Dimensionals, Die Cutting and Embossing Machine. A small ruler and pencil is helpful.
Now let's stamp the white pieces--I used Mossy Meadow for all the stamping. Stamp the holly branches on the top and bottom of the 1 1/4" by 5 1/4" pieces and stamp the other sentiment as below--be sure the white square is turned like a diamond before stamping. Attach the Shining Christmas Specialty DSP to the card-- the front panel is the 2 3/4" by 5 1/4" holly piece and the stripes go on the last folded area. Attach the white stamped strips next to the stripes as below.
Below is my Facebook Live from 9/18/23 where I make this card, and show you some tips to help with the cardmaking. Join me every Monday at 1 pm PST for some cardmaking fun over on Stamp with Dr Robin on Facebook. Or follow me on YouTube with the same name (be sure to hit the Subscribe button while you are there). And let me know if you have questions. You can click on the red Robin above left to order these supplies from my store.
Happy Stampin',
Robin


.JPG)


Comments
Post a Comment