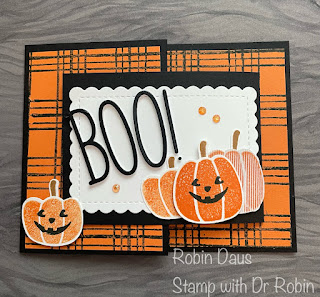
Pick of the Patch Joy Fold Card
This fun joy fold card just makes me smile. I'm loving the Pick of the Patch bundle lately for its versatility--it can make beautiful fall cards, great Thanksgiving cards, and today a Halloween card. And all from a relatively inexpensive punch bundle. Now are you wondering where the Pumpkin Pie Designer Series Paper in the background is from? It's not DSP--I made it with the Sketched Plaid background stamp. Another versatile stamp set that I'm sure will be making an appearance on some holiday cards later this year. For some hints and tips on using this large sized stamp, and making this card, please watch my Facebook Live down below. Better yet, join me every Monday at 1 pm PST on my Stamp with Dr Robin Facebook group to make another fun card.
Time to make this card! Gather your supplies:
1. Basic Black cardstock --Card base 4 1/4" by 8 1/2"" scored on the long side at 3" and folded along the score line. Second piece 3 by 8" scored at 4". Third piece 2 1/4" by 1 5/8" (for cutting the letters).
2. Basic White cardstock--One piece 2 3/4" by 3 3/4", a second piece (for the front) cut with the 3rd largest Scalloped Contours rectangle and a scrap to stamp the pumpkins and stems.
3. Pumpkin Pie cardstock--2 pieces 4" by 5 1/4"
4. Textured 12" by 12" Shimmer Paper--small scrap of the white
5. Stamp Sets--Pick of the Patch, Sketched Plaid
6. Punch--Pick of the Patch
7. Dies--Scalloped Contours, Alphabet a la Mode
8. Ink--Pumpkin Pie, Memento Tuxedo, Pecan Pie
9. Iridescent Rhinestones Basic Jewels
10. Blends--Dark Pumpkin Pie
11. Foam Adhesive Sheets
12. Basic supplies--Bone folder, Paper Snips, adhesive (I like Multipurpose Glue), Paper Trimmer, Take Your Pick Tool, Piercing Mat, Cut and Emboss Machine, Regular Dimensionals
Start by stamping the Sketched Plaid stamp on the 2 Pumpkin Pie cardstocks, trying to make the lines at the same level. If you still have a Stamparatus, that would make this easier. Cut one of them down to 4" by 2 3/4". Attach the big piece to the inside of the card and the smaller one to the front, lining up the lines to match. Now go ahead and fold the smaller piece of Basic Black in half and attach it to the inside of the card as below making sure you are equal distance from the top/bottom/right side and are straight.
Below is my Facebook Live from 9/25/23 where I make this card, and show you some tips to help with the cardmaking. Join me every Monday at 1 pm PST for some cardmaking fun over on Stamp with Dr Robin on Facebook. Or follow me on YouTube with the same name (be sure to hit the Subscribe button while you are there). And let me know if you have questions. You can click on the red Robin above left to order these supplies from my store.


.JPG)


Hi Robin
ReplyDeleteDo you happen to have a tutorial for this Halloween card. Love it