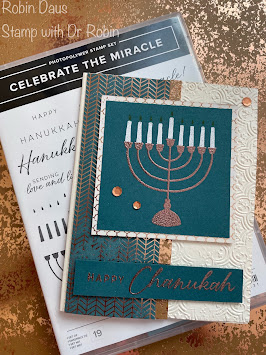
Celebrate the Miracle
Chanukah is a Jewish holiday celebrated end of November or December (it is on a lunar catalog so it moves dates) that commemorates the rededication of the second Temple in in Jerusalem in 165 BC by the Maccabees after its desecration by the Syrians. It is said the small amount of oil that was left in the oil lamps should have lasted only 1 day and it lasted 8 days until someone could get some back to the temple--that is the Chanukah miracle. We celebrate by lighting a candelabra (we call it a menorah) with 8 candles to remember those 8 days, plus one to light the others.
I am so excited to announce that for the first time in the 7 years I have been a demonstrator, Stampin' Up! has a dedicated Chanukah stamp set and here it is. It has wonderful sentiments and imagery. I've only had it for 2 days and am having such fun with it. The above card is my first attempt at a card for the holiday that starts the evening of December 7th this year.
I am having a class at my house on 11/5 using this class and I will also be able to send this to you for $10 more. The class includes:
Class includes:
1. All the supplies, including envelopes, to make 6 cards (2 each of 3 different design
2. Celebrate the Miracle stamp set
3. Night of Navy & Gold Glitter Ribbon 2 yards of each
4. Silver & White Sheer Ribbon 2 yards of each
5. Shining Brightly Designer Series paper--1/2 package
Cost: $45 (please pay via Venmo, check or PayPal ASAP as I will need to order the above and some of these items aren't coming back into stock until later this month and I want to be ready to order when they do). Email me at stampwithdrrobin@gmail.com if you are interested.
Let's make this card! Gather your supplies:
1. Very Vanilla Thick cardstock --Card base 5 1/2" by 8 1/2" scored on the long side at 4 1/4" and folded along the score line.
2. Pretty Peacock cardstock--one piece 2 3/4" by 3", a second piece 3/4" by 4"
3. Oxidized Copper DSP--1/4" by 5 1/2"
4. All About Autumn DSP cut 3" by 3 1/4" (for under the menorah) and the teal piece 2" by 5 1/2"
5. Stamp Sets--Celebrate the Miracle
6. Embossing Folder--Distressed Tile EF
7. Ink--Pretty Peacock and Crushed Curry
8. Neutrals Adhesive-Backed Sequins
9. Embossing supplies--Copper and White Embossing powder, embossing buddy, heat gun, Versamark
10. Basic supplies--Bone folder, Paper Snips, adhesive (I like Multipurpose Glue), Paper Trimmer, Glue Dots, Take Your Pick Tool, Die Cutting and Embossing Machine, Mini and Regular Dimensionals
Start with the heat embossing. Emboss the menorah base using Copper Embossing Powder--wipe the 2 3/4" by 3" piece of Pretty Peacock cardstock with your embossing buddy, then stamp with Versamark, cover with Copper Embossing Powder and shake off, then melt the powder with your heat gun. Then stamp the candles in Versamark and use white embossing powder as above. Stamp the candles in Crushed Curry (yes the color changes on the Peacock cardstock).
Now we will put it all together. Use the Distressed Tile Embossing Folder to emboss the front of the card. If you don't know how to do this, watch my Facebook Live below. Attach the teal piece of All About Autumn DSP to the left side of the card front. Attach the skinny piece of Oxidized Copper DSP to the right side of the teal piece. Attach the menorah to the 3" by 3 1/4" piece of All About Autumn DSP (it's the one with copper in it, has a big scene on the other side). Attach that to the front of the card with Dimensionals.
Attach the sentiment to the card with Dimensionals also. I used 2 large and 1 small copper Neutrals Adhesive-Backed Sequins. Here's your finished product:


.JPG)


.JPG)


Love this card
ReplyDelete