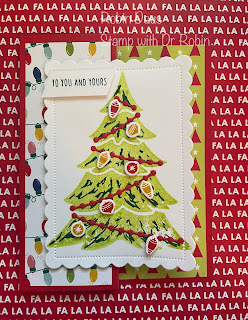
Merriest Trees Fun Fold
I recently received the Merriest Trees bundle and am having such fun creating with it. There are 16 stamps and 26 dies with this bundle, and the bonus is that it also cuts out some of the trees in the A Walk in the Forest Designer Series Paper on page 5 of the September-December Mini Catalog. I love it when our Stampin' Up! dies cut out our DSP! Take a look on page 12 of the catalog to see the whole set and then go on a hunt through the rest of the catalog as the trees appear on some other pages too.
Here is the card unfolded:
Materials:
1. Poppy Parade cardstock-- card base 8 ½” by 5 ½” scored on the long side at 2 1/8” and 4 ¼” and folded accordion style, 1 5/8” by 3 ¼” piece (for cutting the swag)
2. Merry Bold & Bright DSP—the front piece 1 7/8” by 5 ¼” and the inside piece 4” by 5 ¼”
3. 3. Basic White cardstock—2 pieces cut
with the second to largest Scalloped Contours rectangle, ½” scrap for the front
sentiment and another scrap for the ornaments
4. 4. Ink—Lemon Lime Twist, Shaded Spruce,
Poppy Parade and Crushed Curry
5. 5. Merriest Trees bundle
6. 6. Scalloped Contours dies
7. 7. Optional—Iridescent Adhesive-Backed Discs or Glossy Dots Assortment for ornaments
8. Basic supplies--Bone folder, Paper Snips, adhesive (I like Multipurpose Glue), Paper Trimmer, Die Cutting and Embossing Machine, Regular and Mini Dimensionals
Fold the
card base in half and then fold along the 2 1/8” score line, folding it back on
itself. Attach the smaller DSP to the front part and the larger piece to the
inside.
On one of
the Basic White Scalloped Contours pieces stamp the large filled in Christmas tree
with Lemon Lime Twist, and the lines in Shaded Spruce.
Stamp the
outside sentiment using Shaded Spruce on the ½” piece of Basic White and
diagonally cut both ends.
Die cut the
swag pieces from the small piece of Poppy Parade.
On a scrap
of Basic White stamp the ornaments twice first in Crushed Curry, then clean the
stamp and stamp 2 sets in Poppy Parade. Cut them out with the dies. If you want
to skip this step and just use gems you can do that alternatively.
Stamp the
inside sentiment in Poppy Parade ink on the other Basic White Scalloped
Contours piece. Stamp a present in Crushed Curry ink topped with a Shaded
Spruce bow. Here's how the inside will look:
Glue the
Poppy Parade swag pieces to the tree diagonally. Attach 3-4 of each ornament to
the tree using Mini Dimensionals, or use 7 Iridescent Adhesive-Backed Discs or
Glossy Dots Assortment for ornaments.


.JPG)


Comments
Post a Comment