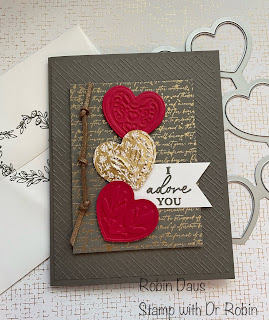
Adoring Hearts Masculine Card
The new Adoring Hearts bundle includes not just a stamp set and die set, but also a 3D Hybrid Embossing Folder. The "hybrid" part means that the die fits in the embossing folder, so you can emboss these beautiful hears AND cut them out at the same time. The dies also include some separate hearts for you to cut out as well as some leaves and a banner piece--one of the sentiments in the stamp set fits on this banner die also. I made this card to give my husband for Valentine's Day (or for our anniversary) which is why there is no bling on it. My husband and son always tell me "No ribbon and no bling on guy cards", but I think they will be ok with the Faux Leather Trim I used. We all tend to have trouble making guy cards, so here is one to get you started.
If you get lost, watch me make this card on my Facebook live below and then come back every Monday at 1 pm PST to join me for more card making fun! Or you can watch me on YouTube--both are at Stamp with Dr Robin.
This card was inspired by one made by my fabulous upline Peggy Noe. Here's her card which is a more feminine version. I just love it:
Let's make this card! Gather your supplies:
1. Pebbled Path cardstock --Card base 5 1/2" by 8 1/2" scored on the long side at 4 1/4" and folded along the score line. Second piece 4" by 5 1/4".
2. Nature's Sweetness Specialty DSP--3" by 4" piece and one heart cut and embossed using the Adoring Hearts 3D Hybrid Folder and dies.
3. Basic White cardstock-- inside piece 3 3/4" by 5". A second piece 1" by 2" for the sentiment
4. Real Red cardstock--emboss and cut out 2 hearts.
4. Stamp Sets--Adoring Hearts
5. Dies and Embossing Folder--Adoring Hearts 3D, the hash-mark looking Basics 3D Embossing Folder (an Online Exclusive)
6. Ink--Pebbled Path
7. Faux Leather Trim-7 1/2" piece
8. Basic supplies--Bone folder, Paper Snips, adhesive (I like Multipurpose Glue and Seal+), Paper Trimmer, Take Your Pick Tool, Piercing Mat, Regular Dimensionals, Cut and Emboss Machine, Mini Glue Dots.
Fold your card base in half. Run the 4" by 5 1/4" piece of Pebbled Path through your Cut and Emboss Machine using the the hash-mark looking Basics 3D Embossing Folder and attach it to your card base.
Now let's do some stamping. Using your Pebbled Path ink, stamp the front sentiment on the 1" by 2" piece of Basic White. Flag the right side--watch my Facebook Live if you don't know how to do this. Stamp the pretty heart wreath on the back of your envelope and the sentiment below on the 3 3/4" by 5" piece of Basic White and attach it to the inside of your card.
Back to the outside of your card. You will need to use the dies and 3D Embossing Folder to cut 2 red and one gold heart (from the Nature's Sweetness Specialty DSP). Now I used a full 6" by 6" of each of those papers, but that gives you 9 hearts of each, but I was going to make several cards with this. To do this, you lay the big heart die with the cutting edges facing up into the front (the one with the Stampin' Up! logo) of the embossing folder. Then lay your paper over it--if you are using DSP you want the side facing you that you will be using on your card. Then carefully fold the back of the folder over the top of this and run it through the machine, fold first.
Attach the overlapping hearts with Dimensionals and then the sentiment using Multipurpose Glue or a Seal/tape runner. Tie 3 knots in the Faux Leather trim and attach it to the left of the hearts using 3 Glue Dots, one to the back of each knot. Cut off the excess trim. Attach this whole piece to your card using Dimensionals.
Here's another look at the card.
Below is my Facebook Live from 1/8/24 where I make this card, and show you some tips to help with the cardmaking. Join me every Monday at 1 pm PST for some cardmaking fun over on Stamp with Dr Robin on Facebook. Or follow me on YouTube with the same name (be sure to hit the Subscribe button while you are there). And let me know if you have questions. You can click on the red Robin above left to order from my store.
Happy Stampin',
Robin


.JPG)


I absolutely love this card! And I love what you did with the Faux Leather trim. I've been struggling with how to use that.
ReplyDelete