Light the Sky
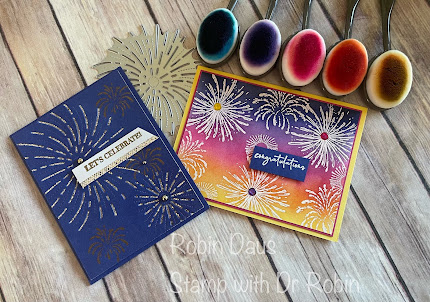
The Light the Sky bundle has been sitting on my desk for a while now--I couldn't decide which card to make today, so you got both! This is a fun set that has a Happy New Year sentiment in it (which we don't often see in a Stampin' Up stamp set) but it is also perfect for other occasions that we celebrate that deserve some happy fireworks. As you can see it has dies that cut firework shapes in the card, without cutting out the shape completely. It's hard to see the incredible sparkle from the gold More Dazzle Specialty paper shining through on the card on the left, but it is very sparkly.
Let's make these cards! I call the card on the left card 2 and the other one card 1, only because that's the order I made them in on my Facebook Live which I attached below. Come watch me at Stamp with Dr Robin every Monday at 1 pm PST. Gather your supplies:
1. Card base 5 1/2" by 8 1/2" scored on the long side at 4 1/4" and folded along the score line. For card 2 it's Starry Sky and for card 1 it's Daffodil Delight
2. Starry Sky cardstock--for card 2, 4" by 5 1/4" and for card 1, 3/4" by 2" for the sentiment
3. Melon Mambo cardstock for card 1, 4" by 5 1/4"
4. Gold More Dazzle Specialty Paper 4" by 5 1/4" for card 2 and a second piece 1/2" by 3"
5. Basic White cardstock--both have 3 3/4" by 5" for the inside. For card 2 also 1/2" by 3" for the sentiment and card 1 has a 3 7/8" by 5 1/8" piece for stamping the fireworks.
6. Stamp Set--Light the Sky
7. Ink--Starry Sky and Versamark for both. For card 1 also Daffodil Delight, Calypso Coral, Melon Mambo, Highland Heather and Night of Navy
8. Embellishments--Blooming Pearls in gold for card 2 and Glossy Dots Assortment for card 1
9. Embossing supplies--Gold and White Embossing powder, embossing buddy, heat gun, Versamark
10. Basic supplies--Bone folder, Paper Snips, adhesive (I like Multipurpose Glue), Paper Trimmer, Glue Dots, Take Your Pick Tool, Die Cutting and Embossing Machine, Regular Dimensionals, Blending Brushes
Here is a close-up of card 1. I started with my piece of Basic White cardstock, wiping it with my embossing buddy and using 3 different stamps with Versamark ink. I actually stamped 3 of the larger stamp, then embossed using white embossing powder before going on to the other 2 firework stamps (makes it easier to see where you've already stamped if you do it this way). Heat with your heat gun. To do the sunset colors, I started with the lightest (Daffodil Delight) on the bottom and applied using my Blending Brushes. Then I moved on to the other colors above, blending them with the color below, with Night of Navy being the last one--watch my video below for help with this. Be sure to wipe off whatever ink is on the white embossed part when you are done, so the colors are seen better.
Stamp the much longer congratulations sentiment in Versamark on the 3/4" piece of Starry Sky and emboss in white. Then cut off the rest of the words.
For the inside, stamp one of the fireworks in Starry Sky on the other piece of Basic White. Attach this to the inside of the card. Attach the firework piece to the Melon Mambo piece and then attach that to the front of the card. Attach the sentiment using Dimensionals. For the embellishments, I used 1 large Daffodil Delight, 1 large Melon Mambo and one large Gorgeous Grape Glossy Dot in the center of 3 fireworks.
Now on to card 2. I used 2 of the firework dies cut at the same time on the 4" by 5 1/4" piece of Starry Sky. Then use one of the fireworks and stamp in Versamark (after using your Embossing Buddy) 3 times, cover with Gold Embossing Powder and flick off the extra and then heat with your Heat Tool. Attach this to the Gold More Dazzle Specialty Paper and then to the front of your card base using Dimensionals.
Below is my Facebook Live from 1/1/24 where I make this card, and show you some tips to help with the cardmaking. Join me every Monday at 1 pm PST for some cardmaking fun over on Stamp with Dr Robin on Facebook. Or follow me on YouTube with the same name (be sure to hit the Subscribe button while you are there). And let me know if you have questions. You can click on the red Robin above left to order from my store.
Happy Stampin',
Robin


.JPG)


Comments
Post a Comment