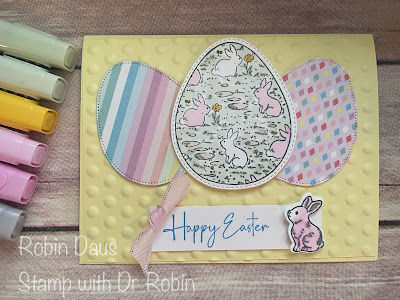
Excellent Eggs
It's time to start making Easter cards and the Excellent Eggs bundle with the Lighter Than Air Designer Series Paper is the perfect match to make this happen. I love that with this bundle you get multiple types and sizes of dies to cut out the stamped eggs or just pretty DSP eggs. And I can't get enough of that adorable little bunny! If you want more tips and tricks, and to see some other cards I made with this set, please watch my Facebook Live below and then come back every Monday at 1 pm PST to join me for more card making fun! Or you can watch me on YouTube--both are at Stamp with Dr Robin.
Let's make this card! Gather your supplies:
1. Lemon Lolly cardstock --Card base 5 1/2" by 8 1/2" scored on the long side at 4 1/4" and folded along the score line. Second piece 4 1/8" by 5 3/8"
2. Lighter Than Air DSP--cut 2 of the smaller eggs
3. Basic White cardstock-- 2 pieces 3 3/4" by 5". A third piece 3/4" by 3 1/8" for the sentiment
4. Stamp Sets--Excellent Eggs
5. Ink--Basic Gray and Azure Afternoon
6. Dies--Excellent Eggs
7. Embossing Folder--the Dot one from the Basics 3D Embossing Folders (On-Line Exclusive)
8. Sheer Ribbon Combo Pack--small piece of Bubble Bath
9. Blends--L&D Bubble Bath, D Daffodil Delight, L&D Soft Seafoam, Ivory and your Color Lifter
10. Basic supplies--Bone folder, Paper Snips, adhesive (I like Multipurpose Glue and Seal+), Paper Trimmer, Take Your Pick Tool, Regular and Mini Dimensionals, Cut and Emboss Machine, Mini Glue Dots.
Fold your card base in half. Run the second piece of Lemon Lolly through your Cut and Emboss Machine inside the Dot Basics 3D Embossing Folder. Attach to your card front--Multipurpose Glue works best for this.
Stamp the large bunny egg on Basic White using Basic Gray ink. Color it in as below. Stamp the little bunny on the same piece of Basic White and color it in using the Light &Dark Bubble Bath. Cut both out using the dies. Cut the 2 smaller egg dies using Lighter Than Air DSP.
Let's finish putting the card together. Attach the 2 smaller eggs using Multipurpose Glue and the stamped egg using Dimensionals. Attach the sentiment using the glue, and the bunny using 1 regular and 1 Mini Dimensional. Tie a knot in the Bubble Bath ribbon, slant cut the ends and attach with a Mini Glue Dot. Enjoy and Happy Easter!
Below is my Facebook Live from 2/26/24 where I make these cards, and show you some tips to help with the cardmaking. Join me every Monday at 1 pm PST for some cardmaking fun over on Stamp with Dr Robin on Facebook. Or follow me on YouTube with the same name (be sure to hit the Subscribe button while you are there). And let me know if you have questions. You can click on the red Robin above left to order from my store.
Happy Stampin',
Robin


.JPG)


Comments
Post a Comment