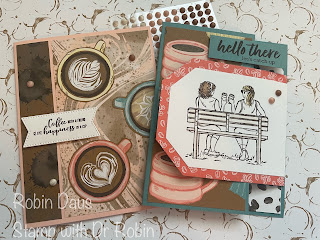
Latte Love Sneak Peek
A Little Latte is an amazing suite of products for all you coffee and latte drinkers that goes live for everyone 3/5/24 as On-Line Exclusives. The suite includes Latte Love bundle, the DSP you see above and the Swirl Dots I used on my cards. There is also a burlap type ribbon with white dots on it, but I don't have that yet to show you. This suite pairs well with the Coffee with Friends stamp set in the Annual Catalog as well as the retired Nothing's Better Than (ie, coffee) bundle. We haven't had coffee DSP in a while and I know you can't see the Swirl Dots well in the picture, but they do look swirled, like the DSP. For a look at the entire set of DSP, and more hints on making the cards, watch my video below.
Let's make these cards! I will call the card on the left card 1 and the one on the right, card 2. Gather your supplies:
1. Petal Pink cardstock --For card 1 card base 5 1/2" by 8 1/2" scored on the long side at 4 1/4" and folded along the score line
2. Lost Lagoon cardstock--For card 2 card base 5 1/2" by 7 1/4" scored on the long side at 4 1/4" and folded along the score Line. Sentiment piece is 3/4" by 2 1/2"
3. A Little Latte DSP--For Card 1 the dark splotched piece is 1" by 5 1/4" and the lighter piece is 3" by 5 1/4". For Card 2, the front piece is 2 3/4" by 5 1/4". the inside bean piece can be 1 1/4" or 1 1/2" by 5 1/4" and the Calypso Coral piece is cut with the largest Countryside Corners die
4. Basic White cardstock-- For card 1 inside piece 3 3/4" by 5" and a second piece cut with the Stylish Shapes die. For card 2 a piece cut with the second largest Countryside Corners die and the inside piece is 4" by 5 1/4"
5. Stamp Sets--Latte Love, Coffee with Friends
6. Dies --Latte Love, Countryside Corners, Stylish Shapes
7. Ink--Early Espresso
8. Adhesive Backed Swirl Dot
9. Blends--Dark Lemon Lolly and Light Pecan Pie
10. Basic supplies--Bone folder, Paper Snips, adhesive (I like Multipurpose Glue and Seal+), Paper Trimmer, Take Your Pick Tool, Piercing Mat or Glass Mat, Regular Dimensionals, Cut and Emboss Machine, Blender Pen (for card 2)
Let's start with card 1 on the left above and here is another picture of it. Fold your card base in half, and attach the 1" piece to the left and the other piece of DSP to the right. Either fussy cut 3 of the cups of coffee out, or use the Latte Love dies to do it. Here I fussy cut them and on the video I used the dies. Attach them to the card, either flat or with Dimensionals but be sure to leave room for the sentiment.

Stamp the sentiment on the Stylish Shapes die cut in Early Espresso (used for all stamping) and attach to the card front using Dimensionals. Stamp the food/coffee from Coffee with Friends in the bottom right of the inside piece. Stamp off 1-2 times using the blotch from Latte Love and stamp in the upper left corner. Attach to the inside of the card. I scattered one of each color of the Swirl Dots on the front of the card.
Now let's move on to card 2. Fold along the score line and you can attach the front piece of DSP.
Time to stamp with the Early Espresso again. Stamp the ladies from Coffee with Friends either on a quarter sheet of Basic White and then cut it out, or on to the second largest die cut from Countryside Corners. Be sure you don't stamp in the center--it needs to be about 1/2" from the right side. While the ink is still wet, use your Blender Pen to move some of the ink around on the bench to get that light coloring. I colored the ladies' hair with Blends in Light Pecan Pie and Dark Lemon Lolly but use whatever colors you'd like. You could even color more, but I wanted to keep it simple. Attach this to the piece of DSP cut using the largest Countryside Corner die.

Attach the small piece of DSP to the 4" by 5 1/4" piece of Basic White and stamp some of the blotches in Early Espresso--I stamped off 1-2 times before stamping on my cardstock. Score the right side of the piece with the ladies at about the upper right corners and fold it under. Attach the back of that small piece to the INSIDE of back of the card, then place the inside piece over it as below. I love that you can see both sides of the DSP with this fold. If you are confused with this, watch my video below.
Attach a couple of the
Adhesive Backed Swirl Dots to the front of the card and you are done.
Below is my Facebook Live from 2/19/24 where I make these cards, and show you some tips to help with the cardmaking. Join me every Monday at 1 pm PST for some cardmaking fun over on Stamp with Dr Robin on Facebook. Or follow me on YouTube with the same name (be sure to hit the Subscribe button while you are there). And let me know if you have questions. You can click on the red Robin above left to order from my store.


.JPG)


Comments
Post a Comment