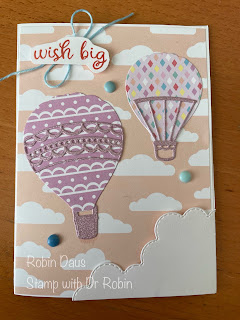
Hot Air Balloons Fun Fold
I have had this Hot Air Balloon bundle on my desk for a while now as I am doing a class this coming weekend using the bundle and this will be one of the cards. I love the sentiments in this stamp set, and really love all the different dies--it's mix and match and I come up with something different every time I play with it. This time I paired it with the cloud die from Basic Borders dies for some extra cloud action. You may not be able to tell, but this is a fun fold--the clouds on the bottom open up the card.
I don't think you can see it in the picture, but that is shimmer paper on the balloon accents and buckets. This Soft Shimmer Paper Combo Pack is found on page 127 in the Annual Catalog and has 5 different colors--they say this one is Bubble Bath but it looks more like Fresh Freesia to me.
I have room for one more person on 3/9 for this class, or you can sign up and I can send it to you for $10 more. Email me at stampwithdrrobin@gmail.com if you are interested. Here are the options for this class:
Option 1--The I want it all--Everything to make 4 cards with envelopes, entire Lighter than Air Suite and the class is free: $90 (and one free $50 SAB item)
Options 2--Everything to make 4 cards with envelopes, 1/4 pack of Lighter Than Air DSP, 1/2 pack of Rainbow Adhesive-Backed Dots, Hot Air Balloon OR Excellent Egg Bundle: $66 (class is half price)
Option 3--Everything to make 4 cards with envelopes, 1/4 pack of Lighter Than Air DSP, 1/2 pack of Rainbow Adhesive-Backed Dots, Everyday Details Bundle: $73 (class is half price)
Option 4--Everything to make 4 cards with envelopes, 1/4 pack of Lighter Than Air DSP, 1/2 pack of Rainbow Adhesive-Backed Dots: $25
Option 5--PDF for the cards only $20
Let's make this card now! Gather your supplies:
1.Basic White cardstock --Card base 5 1/2" by 11" scored on the long side at 4" and 8".
2. Lighter Than Air DSP--cut the pink with clouds 3 7/8" by 5 3/8", cut a small and a large balloon from 2 other papers. Use the piece you cut off from the pink with clouds paper to cut a 1/2" by 4" piece for the inside.
3. Soft Shimmer Paper Combo Pack--the pinkish/purplish one. Cut the 2 balloon embellishments and one big basket
4. Stamp Set--Hot Air Balloon
5. Ink--Calypso Coral
6. Dies--Hot Air Balloon and Basic Borders
7. Rainbow Adhesive-Backed Dots
8. Baker's Twine Three Color Pack
9. Basic supplies--Bone folder, Paper Snips, adhesive (I like Multipurpose Glue and Seal+), Paper Trimmer, Take Your Pick Tool, Regular Dimensionals, Cut and Emboss Machine, Mini Glue Dots.
Start with your card base--fold in along the fold lines. The smaller piece is the front and becomes the clouds. Using the cloud Basic Border die, place one edge on the fold and angle the die toward the front bottom corner. You will probably have to turn the whole card a bit like below to get it to go through the machine and you will want to run it just partially through and back so as to not bend the card. If you want to watch me do this, please watch my Facebook Live below and then come back every Monday at 1 pm PST to join me for more card making fun! Or you can watch me on YouTube--both are at Stamp with Dr Robin.

Next place that same front fold line on the cutting line in your cutter as below and cut from the top to where you just cut the die clouds as below. Now you have your card base cut out!
Now put your balloons together as below--add the shimmer paper dies with glue, or you could use Adhesive Sheets when you cut them out to make it easier. Fold the die cut clouds to the front before you add the balloons to the card. With the piece of Basic White you cut off, stamp the front sentiment and fussy cut it out. Tie a bow in the Balmy Blue Baker's Twine and attach it with glue or a Mini Glue dot and attach the sentiment over it using Dimensionals. Add one of each of the large, blue Rainbow Adhesive-Backed Dots.
For the inside, stamp the sentiment in Calypso Coral. Attach the 1/2" by 4" piece of DSP to the bottom of the inside and you are done.
Below is my Facebook Live from 3/4/24 where I make these cards, and show you some tips to help with the cardmaking. Join me every Monday at 1 pm PST for some cardmaking fun over on Stamp with Dr Robin on Facebook. Or follow me on YouTube with the same name (be sure to hit the Subscribe button while you are there). And let me know if you have questions. You can click on the red Robin above left to order from my store.
Robin


.JPG)


Comments
Post a Comment