Attention Shoppers!
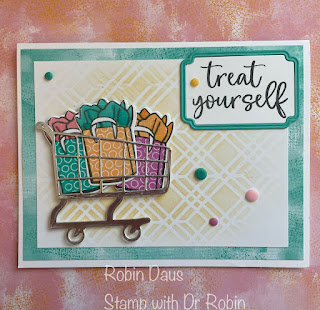
Attention all you shoppers (and I know you like to shop, at least for new stamping products)! This stamp set from the upcoming 2024-5 Annual Catalog will have you smiling from the time you first see it. I can think of so many people who would enjoy a card using this stamp set and it is so versatile--you can use it for birthdays, thank you cards and so much more. I feel like I've only scratched the surface of this stamp set with this card, so expect more to come from me using it! And notice I used one of the soon to be retiring masks on this card--get them now while they are only $6 before they run out.
If you get lost making this card, or just want some more tips and tricks when using this stamp set, watch my Facebook Live below, then join me every Monday at 1 pm PST at Stamp with Dr Robin and see another card.
Let's make this card. Gather your supplies:
1. Basic White Thick cardstock --Card base 5 1/2" by 8 1/2" scored on the long side at 4 1/4" and folded along the score line.
2. Basic White cardstock-- 3 3/4" by 5" and a scrap for cutting out the shopping bags and sentiment piece
3. Summer Splash cardstock--for cutting the sentiment frame
4. 2024-26 In Color 6" by 6" DSP
5. Unbounded Beauty DSP--4" by 5 1/4"
6. Silver Foil
7. Stamp Sets-- Attention Shoppers
8. Ink--Basic Gray and Peach Pie
9. Dies--Attention Shoppers, Unbounded Love
10. Wink of Stella--BACK IN STOCK!!
11. Foursquare Decorative Masks (about to retire and on sale now)
12. Blends --Lt and Dark Peach Pie, Pretty in Pink and Summer Splash
13. 2024-26 In Color Resin Dots
14. Basic supplies--Bone folder, Paper Snips, adhesive (I like Multipurpose Glue and Seal+), Paper Trimmer, Regular and Mini Dimensionals, Cut and Emboss Machine, Regular or Mini Blending Brush
Start by stamping 3 shopping bags with Basic Gray ink on a scrap of Basic White cardstock. Also stamp the bottom half of the bag on 3 of the colors of the dotted pieces of 2024-26 In Color 6" by 6" DSP. Fussy cut out the bag--you will want to cut around where the handles attach--I like to cut more towards the inside of the lines. Color the tissue paper part of the bag with 3 of the Blends--make sure they are in coordinating colors with whichever of the In Color DSP you used. Now attach the DSP to your bags and die cut them out with the matching dies.
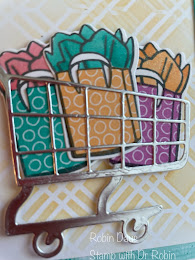
Cut the 2 pieces of the shopping cart in silver foil (coming back in the new catalog) using the dies. Glue them together. Attach the bags together and then to the inside of the shopping cart--use just a smidge of glue.
Using the die from Unbounded Love, cut once in white and once in Summer Splash. Glue the 2 outside frames together with the white one on the bottom. Stamp the sentiment on the Basic White die cut.
Take your 3 3/4" by 5" piece of Basic White and lay one of the Foursquare Decorative Masks on top. Some people like to tape the paper and mask down while doing this, but I like to check how dark the ink is as I go, so I don't do that, but you have to be very careful not to move the mask if you don't tape it down. Swirl your Blending Brush in Peach Pie (what a luscious new color!) and tap off most of the ink. Start in the center of the card and lay down a light layer of ink. Keep swirling your brush outward, so that the ink gets lighter as you get to the edge of the card, but don't try to go all the way to the edge of the card.
Now let's put it all together! Attach the Unbounded Beauty DSP to your folded card front, then attach the Basic White piece that you just made with the masks. Attach the shopping cart and bags using Dimensionals--you will use half of a Mini Dimensional on the wheels and regular ones on the cart. Attach the frame to the sentiment in the top right and then the sentiment piece to the inside.
Don't forget to stamp a shopping bag on the inside and on the envelope! As our founder Shelli would say, "No naked envelopes!". For the inside I stamped off the shopping bag in Peach Pie and stamped the sentiment over it in Basic Gray.
Add 5 of the 2024-26 In Color Resin Dots. Use a bit of Wink of Stella on the tissue papers. I like to do this at the very end, so I can leave it alone and let it dry. I hope you are looking forward to ordering this bundle--let me know if I can order it for you on 5/1.
For a little fun here's another look at the cards but this time in an adorable shopping cart I bought at World Market--I knew I had to have it when I saw it.
Below is my Facebook Live from 4/15/24 where I make these cards, and show you some tips to help with the cardmaking. Join me every Monday at 1 pm PST for some cardmaking fun over on Stamp with Dr Robin on Facebook. Or follow me on YouTube with the same name (be sure to hit the Subscribe button while you are there). And let me know if you have questions. You can click on the red Robin above left to order from my store.


.JPG)


Comments
Post a Comment