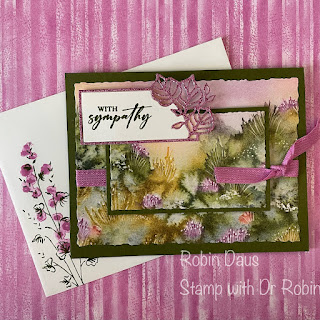
Playing with Thoughtful Journey DSP
Hopefully you have received your new 2024-25 Annual Catalog by now--if not please email me at stampwithdrrobin@gmail.com and let me send you one if you don't have a demonstrator. I am making a card today using the gorgeous 6" by 6" Thoughtful Journey DSP as each page is more beautiful than the last. These pages are stand alone amazing--all they really need is a sentiment added to make a card, but I thought I'd fancy them up today with some other new products. I am loving the In Color Glimmer Paper as well as the Unbounded Love bundle that I used for the sentiment. If you have trouble following along with these directions, please watch my Facebook live below.
Let's make this card. Gather your supplies:
1. Mossy Meadow cardstock --Card base 5 1/2" by 8 1/2" scored on the long side at 4 1/4" and folded along the score line. A second piece 3 3/4" by 2 3/8"
2. Basic White cardstock-- 3 3/4" by 5" piece for the inside and a scrap for the sentiment
3. Thoughtful Journey DSP
4. 2024-26 In Color Glimmer Specialty Paper in Petunia Pop
5. Stamp Sets--Unbounded Beauty, Flowers of Beauty
6. Ink--Mossy Meadow and Petunia Pop
7. Dies--Unbounded Beauty, Deckled Rectangles (an On-Line Exclusive)
8. Petunia Pop Bordered Ribbon
9. Basic supplies--Bone folder, Paper Snips, adhesive (I like Multipurpose Glue and Seal+), Paper Trimmer, Regular Dimensionals, Cut and Emboss Machine
Lay the largest Deckled Rectangle die on your Thoughtful Journey DSP where you thing it will look best on the card. Lay the 5th largest rectangle in the center of this rectangle and tape them down (old washi tape or painter's tape or a post it note work well). Run them through your Cut and Emboss machine together. Adhere the smaller rectangle to the smaller piece of Mossy Meadow and set aside.
Using the Unbounded Beauty die below, cut out from both Basic White and the Petunia Pop Glimmer Paper. Stamp your sentiment on the Basic White central part (save the outside part for another card) using Mossy Meadow ink.
Stamp your inside sentiment using Mossy Meadow ink and also the leafy stamp from Flowers of Beauty. Stamp the larger flower blobs with stamped off Petunia Pop--that means stamp it first on scratch paper and then on the card. Make sure the part with the 3 smaller blobs is on top. Then stamp with the more detailed flowers in full strength Petunia Pop ink. Attach this to the inside of your card.
Let's put the card together. Before attaching the bigger piece of Thoughtful Journey DSP to the card, first tie a piece of Petunia Pop ribbon around the whole thing and tie a knot. After attaching that to the card, attach the smaller piece with the Mossy Meadow backing to the card using Dimensionals. I attached the sentiment with the border piece using Dimensionals on the left side--I placed the Dimensionals strategically holding both the outline piece to the sentiment part--and glue to the right bottom side that overlaps the inside rectangle.
Here's another version of this card using another piece of the Thoughtful Journey DSP.
Below is my Facebook Live from 4/27/24 where I make these cards, and show you some tips to help with the cardmaking. Join me every Monday at 1 pm PST for some cardmaking fun over on Stamp with Dr Robin on Facebook. Or follow me on YouTube with the same name (be sure to hit the Subscribe button while you are there). And let me know if you have questions. You can click on the red Robin above left to order from my store.


.JPG)


Beautiful!
ReplyDelete