
My On Stage Swap
This past week I went to On Stage, a yearly gathering of Stampin' Up Demonstrators that was in Raleigh, North Carolina. We were able to receive the new 2025-6 Annual Catalog and also received some of the new products from it. We make ahead cards to "swap" with other demonstrators and this is one of the cards I made multiples of to swap with other demonstrators. In this post you will also see the other swaps I made, and if you watch my Facebook Live below, you will be able to see a few of the swaps I received from other demonstrators. I will show you more swaps next Monday at 2 pm PST when I do my next Facebook Live.
Let's make this card! Gather your supplies:
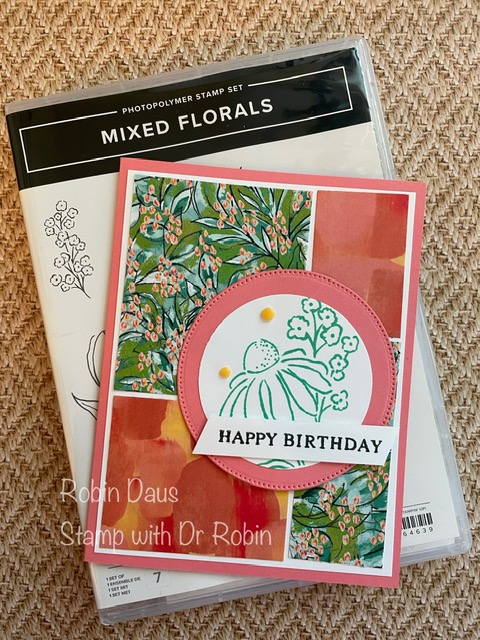
1. Flirty Flamingo cardstock --Card base 8 1/2" by 5 1/2" scored at 4 1/4" and folded in half on the score line. Also die cut the largest Stylish Shapes circle
2. Mixed Media Florals DSP--cut 2 different pieces 3 3/4" by 5" (you will have enough to make 2 card fronts)
3.Basic White cardstock-2 pieces 4" by 5 1/4". Punch a 2 3/8" circle--if you don't have this circle punch, die cut the second largest Stylish Shapes circle. Also a 1/2" scrap piece of Basic White
4. Stamp sets--Mixed Florals and Beautiful Butterfly
5. Dies-- Stylish Shapes
6. Punch--2 3/8" Circle Punch
7. Ink--Shy Shamrock and Memento Black
8. Party Dots
9. Basic supplies--Bone folder, Paper Snips, adhesive (I like Multipurpose Glue and Seal+), Paper Trimmer, Stamp, Cut and Emboss Machine, Take Your Pick Tool, Piercing Mat or Glass Mat Studio, Regular Dimensionals
Fold your card base in half and put it aside.
Cut the 2 DSP pieces together. Place it on your Paper Trimmer in a portrait position and cut at 2 1/2"
Take the larger piece and turn it 90 degrees (landscape position) and cut at 3". Take the smaller piece and turn it 90 degrees and cut it at 2". It is important to keep them in the correct position as this paper is directional.
Put the pieces in their original position (and the 2 pieces of DSP on top of each other). Take the largest green one (from the 3" cut) and the smallest green piece from the 1 1/4" side and move them to the side of the piles, keeping them in their same position (so catty-corner/diagonal to each other). Now take the Flirty Flamingo piece from the bottom of the 3" cut (should be bottom left in your piles) and place it under your 3" wide green piece. Take the top right (diagonal) 3" by 1 1/4" piece of the same paper and put it in the last position. If this is confusing, please watch my Facebook Live below.
Adhere the 4 pieces to the 4" by 5 1/4" piece of Basic White with a small equal border around everything.
Now let's do some stamping. Using Shy Shamrock ink, stamp the top half of the Mixed Florals coneflower stamp on the Basic White punched circle. Attach it to the largest Stylish Shapes Flirty Flamingo circle. Attach this to the front of the card where the DSP corners meet using Dimensionls.
.JPG)
For the inside, ink up the same entire stamp and stamp it off on a piece of scratch paper. Then stamp it on the other piece of Basic White. Attach this to the inside of the card.
.JPG)
Take the 1/2" scrap piece of Basic White and stamp the sentiment from Beautiful Butterfly in Memento Black. Slant cut the 2 ends and add it to the front using Dimensionals.
To finish the front, add one large and one small Peach Pie Party Dots. I've shown below the other swaps I traded at On Stage. I used up almost the entire package of Mixed Media Florals DSP making about 40 swaps!
.JPG)
.JPG)
.JPG)
.JPG)
Below is my Facebook Live from 3/17/25 where I make this card, and show you some tips to help with the cardmaking. Join me every Monday at 1 pm PST for some cardmaking fun over on Stamp with Dr Robin on Facebook. Or follow me on YouTube with the same name (be sure to hit the Subscribe button while you are there). And let me know if you have questions by emailing me at stampwithdrrobin@gmail.com. You can click on the red Robin above left to order from my store.
Happy Stampin'
Robin
.JPG)


Comments
Post a Comment