
A Rainbow of Sweet Jars
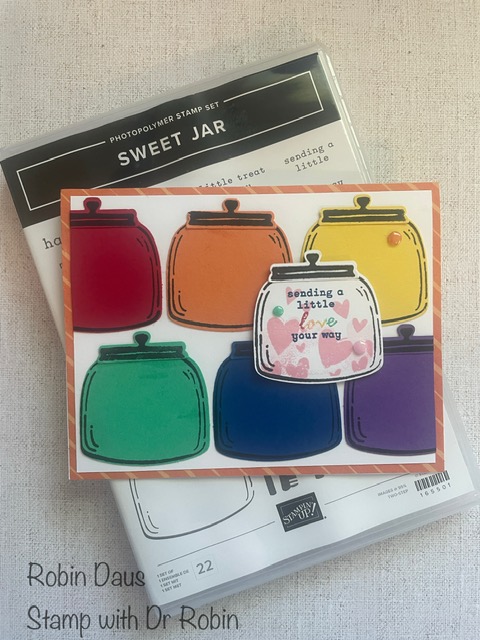
I think the Online Exclusive Sweet Jar bundle is so adorable and easy to use. And, want to know a little secret? Starting 7/1/25 there will be another new Online Exclusive stamp set that will coordinate with the punch. This new set includes some holiday stamps! I am so excited for this upcoming stamp set. Today I wanted to see if I could use the jars as my background for this card and came up with using them in rainbow colors, because who doesn't like a rainbow? And then I realized this card would also be perfect to send a little love for Pride Month, which is always in June. So happy rainbows and happy Pride Month.
If you want some more help with making this card, watch my Facebook Live below, then come back every Monday at 1 pm for a new card over at Stamp with Dr Robin.
If you want some more help with making this card, watch my Facebook Live below, then come back every Monday at 1 pm for a new card over at Stamp with Dr Robin.
Let's make this card! Gather your supplies:
1. Thick Basic White cardstock --Card base 5 1/2" by 8 1/2" scored on the long side at 4 1/4" and folded in half on the score line.
2.Basic White cardstock--4" by 5 1/4" piece and a second approximately 3" by 3" for the jar
3. Celebratory Sips DSP 4 1/4" by 5 1/2"
4. 3" by 3" pieces of cardstock in the following colors: Real Red, Timid Tiger, Daffodil Delight, Shy Shamrock, Blueberry Bushel and Gorgeous Grape (or whatever over rainbow colors you want to use)
5. Stamp sets-- Sweet Jar
6. Punch--Sweet Jar
7. 2024-26 ANK 2025-27 In Color Flat Pearls
8. Ink--Memento Black, Blueberry Bushel, Pretty in Pink
10. Stampin' Write Markers in Real Red, Timid Tiger, Daffodil Delight and Shy Shamrock. DO NOT use Blends
11. Basic supplies--Bone folder, Paper Snips, adhesive (I like Multipurpose Glue and Seal+), Paper Trimmer, Stamp, Cut and Emboss Machine, Take Your Pick Tool, Piercing Mat or Glass Mat Studio, Mini Glue Dots, Regular and Mini Dimensionals
Start by stamping the jar and top on all the 3" by 3" pieces of cardstock using Memento Black ink (one Basic White one and the rainbow colors). Punch them out. Attach the tops to the jars using a little Multipurpose Glue on the top of the jar--this is easier than putting glue on the lid. Set them aside.
For the white jar, using Pretty in Pink ink, use the background stamp for the hearts. Ink it up, then stamp it off on a piece of scratch paper before stamping it on the jar. Then use the other big heart stamp set and stamp over the background, again in Pretty in Pink ink. Using Blueberry Bushel ink, stamp the "sending a little ... your way" on the jar. Use your Stampin' Write Markers in the same colors as your jars, color the stamp, each letter in the word "love" a different color. Huff on it and then stamp it in the center of the other words.
.JPG)
For the inside, stamp the hearts and Pretty in Pink ink to make it pretty.
.JPG)
Attach the Celebratory Sips DSP to the front of the folded card. Take the 4" by 5 1/4" piece of Basic White and attach the colored jars. Notice the red one on the top left and the purple one on the bottom right are hanging off the edge. Once you've attached them all, you will need to turn the page over and fussy cut off the pieces that hang over. Watch my video below for some hints on how to space out and glue down the jars.
Add one each of the Timid Tiger, Shy Shamrock and Pretty in Pink In Color Flat Pearls.
Here's another picture of the card, and a second one where I added a knot of Timid Tiger Ribbon.
.JPG)

Below is my Facebook Live from 6/16/25 where I make this card, and show you some tips to help with the cardmaking. Join me every Monday at 1 pm PST for some cardmaking fun over on Stamp with Dr Robin on Facebook. Or follow me on YouTube with the same name (be sure to hit the Subscribe button while you are there). And let me know if you have questions by emailing me at stampwithdrrobin@gmail.com. You can click on the red Robin above left to order from my store.
Happy Stampin'
Robin
.JPG)


Comments
Post a Comment