A Joyful Jolly Holly Card
I like an all vanilla and gold card for the holidays as it seems so classy to me. I think you could also use this card for a winter wedding or anniversary just by changing the inside sentiment.
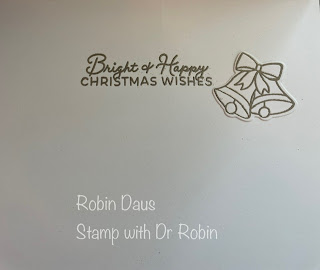
Here's another picture of the inside of the card.
We are using this set, as well as the Jar of Joy stamp set in our Christmas in July class that you can come do here with me in San Diego, or get sent to your house to do at home with the PDFs/video we will send you. The class includes 1/2 pack of paper, 1/2 a spool of ribbon and 2 whole packages of embellishments and everything to make 8 different cards, plus the Jar of Joy stamp set included! Email me at stampwithdrrobin@gmail.com if you are interested in more information.
Let's make this card! Gather your supplies:
1. Very Vanilla cardstock --Card base 5 1/2" by 8 1/2" scored on the long side at 4 1/4" and folded in half on the score line (I had some old thick Very Vanilla that I used but regular is fine). A second piece 4 1/4" by 5 1/2". A third piece die cut from the smaller rectangle in this die set. A scrap for the bells
2. Gold Foil 2" by 3 1/4" piece--die cut the larger of the rectangles and from the inside of the rectangle cut the word "joy" (cut them both at the same time) from the middle so it doesn't show.
3. Bundle--Jolly Holly
4. Embossing supplies--embossing buddy, Versamark, gold embossing powder, heat gun
5. Basic supplies--Bone folder, Paper Snips, adhesive (I like Multipurpose Glue and Seal+), Paper Trimmer, Stamp, Cut and Emboss Machine, Take Your Pick Tool, Piercing Mat or Glass Mat Studio, Regular Dimensionals
Attach the Very Vanilla and Gold Foil "joy" die cuts together, offsetting them so you can see just a bit of the gold behind the vanilla. Attach this to the Very Vanilla rectangle and then attach that to the gold rectangle. Please watch my Facebook Live/YouTube below if you want some help with this. Then come back every Monday at 1 pm PST to see me make a new card.
Pull up some of the holly leaves, and nestle the joy rectangle among them--you may have to turn your paper upside down to find how it looks best. Once you like it, glue the rectangles in place and glue the whole thing to the front of your card.
For the bells, take your scrap of Very Vanilla and emboss then cut out 3 of the bells. Remember to use your Embossing Buddy prior to stamping with Versamark. Then pile on the gold embossing powder and flick off the extras. Once you die cut out the bells, attach 2 to the front of your card using Dimensionals.
For the inside, emboss the sentiment in gold and attach the 3rd bell and you are done.
Below is my Facebook Live from 7/14/25 (uploaded to YouTube as Facebook now deletes them after 30 days) where I make this card, and show you some tips to help with the cardmaking. Join me every Monday at 1 pm PST for some cardmaking fun over on Stamp with Dr Robin on Facebook. Or follow me on YouTube with the same name (be sure to hit the Subscribe button while you are there). And let me know if you have questions by emailing me at stampwithdrrobin@gmail.com. You can click on the red Robin above left to order from my store.
YouTube link: https://youtu.be/-SgLHSQORCw
Happy Stampin'
Robin


.JPG)


Beautiful and elegant. Warm greetings from Montreal, Canada 😊 ❤️ 🇨🇦
ReplyDelete