Sunflower Embossing Folder Techniques
The Sunflower 3D Embossing Folder from the Online Exclusives is a must have in my opinion. It makes such beautiful, deep embossed images that can be colored in so many ways, but this time I wanted to show you some techniques you might not have thought to do with it. You may want to watch my Facebook Live below to get a better feel for these techniques and some extra tips on using your punches. I've attached the YouTube link as Facebook is now deleting videos after 1 month and I want you to be able to watch them any time. And then come back every Monday at 1 pm to Stamp with Dr Robin on Facebook for more cardmaking fun.
Let's make these cards! I will refer to the card on the right as card #1 and the card on the left as card #2. Gather your supplies:
1. Basic Black cardstock --Card base 4 1/4"by 8 1/2" scored on the long side at 4 1/4" and folded in half on the score line for card #1. Second piece 4" by 5 1/4" for embossing on card #1. Scrap punched with the Labeled with Love Punch
2. Thick Basic White cardstock--Card base 4 1/4"by 8 1/2" scored on the long side at 4 1/4" and folded in half on the score line for card #2
3. Gold Foil--Scrap punched with the Modern Oval Punch for card #2
4. Basic White cardstock-- 4" by 5 1/4" for the inside of card #1, same for the front of card #2. Punch with the Labeled with Love Punch for card #1 and with Modern Oval Punch for card #2
5. Stamp sets--Simply Said for card #1 and Layers of Beauty for card #2.
6. Ink--Whisper White for card #1, Secret Sea for card #2, and Versamark for both cards
7. Gold & Silver 1/8" Trim Combo Pack--silver one for card #1
8. Secret Sea 3/8" Faux Linen Ribbon for card #2
9. Low Profile Sparkle Dots for card #2
10. Embossing Supplies--Versamark, embossing buddy, white and gold embossing powder, heat gun
11. Basic supplies--Bone folder, Paper Snips, adhesive (I like Multipurpose Glue and Seal+), Paper Trimmer, Stamp, Cut and Emboss Machine, Take Your Pick Tool, Piercing Mat or Glass Mat Studio, Regular Dimensionals
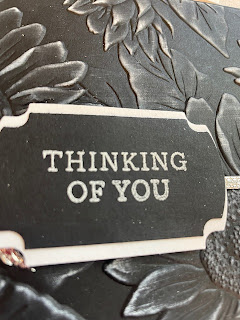
Here's a picture of card #1. Start by embossing the Basic Black 4" by 5 1/4" piece in the Sunflower 3D embossing folder. You can also emboss the envelope flap for an amazing coordinated look.
Now take your Whisper White ink pad (make sure it's well inked), hold it at about 30 degrees and drag it LIGHTLY across the embossed side (the side that the flowers are sticking up off the paper) several times, overlapping the dragging. Be sure you are using the end of the pad that has a smaller plastic part of the case. Put this aside to dry as it takes a few minutes.

Emboss the sentiment from Simply Said on the Basic Black piece punched from the Labeled with Love Punch. Remember to use your embossing buddy first, stamp in Versamark, then pile on the white embossing powder and flicking off the excess. Melt the powder with your heat gun. Take the Basic White Labeled with Love punch and cut it in half down the long way before attaching it to the back of your embossed label, letting an equal amount of white show top and bottom and making sure the side edges are even too.
Use the Silver 1/8" Trim to tie around the bottom (about 1/3 the way up) of the embossed piece and tie a knot. Adhere this to the card front with Multipurpose Glue. Add the sentiment piece popped up on Dimensionals. Attach the 4" by 5 1/4" piece of Basic White to the inside of the card and this card is done!
Card #2 is an elegant anniversary card that uses embossing powder also. Start by embossing the Basic White 4" by 5 1/4" piece in the Sunflower 3D folder. Using the same technique as above, drag the Versamark pad over the top of the sunflowers LIGHTLY--you should make several passes. I know you can't see how much Versamark is on there, but if it is irregular that's ok too. Pile lots of gold embossing powder all over the page and flick off the excess. Remember to use your embossing buddy first, stamp in Versamark, then pile on the gold embossing powder and flicking off the excess. Melt the powder with your heat gun.
Stamp the sentiment in Secret Sea ink on the Basic White Modern Oval punched piece. Cut the gold foiled one like you did above and attach to the back of the sentiment piece.
Use the Secret Sea 3/8" Faux Linen Ribbon to tie around the bottom (about 1/3 the way up) of the embossed piece and tie a knot. Adhere this to the card front with Multipurpose Glue. Add the sentiment piece popped up on Dimensionals.
I used 2 large and 1 small Low Profile Sparkle Dots on the card too.
Below is my Facebook Live from 7/28/25 (uploaded to YouTube as Facebook now deletes them after 30 days) where I make this card, and show you some tips to help with the cardmaking. Join me every Monday at 1 pm PST for some cardmaking fun over on Stamp with Dr Robin on Facebook. Or follow me on YouTube with the same name (be sure to hit the Subscribe button while you are there). And let me know if you have questions by emailing me at stampwithdrrobin@gmail.com. You can click on the red Robin above left to order from my store.
Happy Stampin'
Robin


.JPG)


Comments
Post a Comment